The Ultimate Guide To Cleaning Collard Greens: From Farm To Table
Have you ever stared at a bundle of fresh collard greens and wondered, "How do you clean collards properly?" If so, you're not alone. Cleaning these nutritious leafy greens can seem daunting, especially if you're new to cooking with them. But fear not! This comprehensive guide will walk you through everything you need to know about cleaning collards, ensuring you get the most out of these delicious and healthy greens.
What Are Collard Greens?
Collard greens (Brassica oleracea var. acephala) are a staple in Southern American cuisine and have been enjoyed for centuries. These leafy vegetables belong to the same family as kale, broccoli, and cabbage, and are packed with essential nutrients like vitamins A, C, and K, as well as calcium and fiber. Their slightly bitter taste and hearty texture make them perfect for various dishes, from traditional Southern-style collards to modern salads and smoothies.
Why Proper Cleaning Matters
Before we dive into the cleaning process, it's crucial to understand why proper cleaning is so important. Collard greens, like other leafy vegetables, can harbor dirt, sand, and even small insects. These contaminants not only affect the taste and texture of your dish but can also pose health risks if consumed. Additionally, proper cleaning helps to remove any pesticides or chemical residues that may be present on conventionally grown greens.
- Explosive Leak Mission Impossible 1996 Casts Hidden Scandals Exposed
- You Wont Believe How Andrea Willer Beat The Odds Exclusive Lotto Leak Revealed
- Sex Rituals Of The Rabbit Year Leaked Chinese Calendar Files Expose Everything
How to Clean Collard Greens: Step-by-Step Guide
Now that we understand the importance of cleaning collard greens, let's explore the process in detail. Follow these steps to ensure your collards are perfectly clean and ready for cooking:
Step 1: Gather Your Supplies
Before you begin, make sure you have the following items:
- A large bowl or clean sink
- Cold water
- White vinegar (optional)
- A colander or salad spinner
- Clean kitchen towels or paper towels
Step 2: Remove the Stems (Optional)
While collard stems are edible, many people prefer to remove them as they can be tough and fibrous. To do this:
- Archie And Lilibet In Danger Secret Video Leak Exposes Royal Familys Darkest Secret
- Shocking Nude Leak Garbage Band Lead Singer Exposed In Scandal
- Is Ariana Grande Married The Leaked Video Confirming A Scandalous Union
- Lay a collard leaf flat on a cutting board
- Using a sharp knife, cut along both sides of the stem
- Discard the stem or save it for making vegetable stock
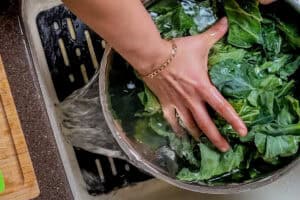
Step 3: Initial Rinse
Place the collard leaves in a large bowl or clean sink filled with cold water. Gently swish the leaves around to dislodge any loose dirt or debris. This initial rinse helps to remove surface-level contaminants.
Step 4: Vinegar Soak (Optional)
For an extra-thorough cleaning, consider soaking your collards in a mixture of cold water and white vinegar. This step can help to:
- Kill bacteria
- Remove pesticides
- Enhance the greens' crispness
To do this, mix one part vinegar with three parts cold water and soak the collards for 5-10 minutes. Rinse thoroughly with clean water afterward.
Step 5: Detailed Cleaning
After the initial rinse (and optional vinegar soak), it's time for a more detailed cleaning:
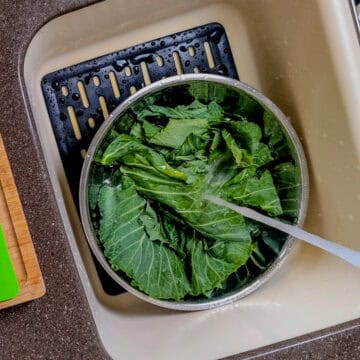
- Fill your bowl or sink with fresh, cold water
- Submerge the collard leaves and gently agitate them
- Pay special attention to the crevices and folds of the leaves, where dirt often hides
- Repeat this process 2-3 times, changing the water between each rinse, until the water runs clear
Step 6: Final Rinse and Drying
Once you're satisfied that your collards are clean, give them a final rinse under cold running water. Then, dry the leaves using one of these methods:
- Salad spinner: Place the leaves in a salad spinner and spin until dry
- Patting dry: Lay the leaves on clean kitchen towels or paper towels and gently pat them dry
- Air drying: Spread the leaves on a clean surface and allow them to air dry for 30-60 minutes
Storage Tips for Clean Collard Greens
Now that your collards are clean, you'll want to store them properly to maintain their freshness:
Refrigeration: Place the clean, dry collard leaves in a plastic bag or airtight container. Store in the crisper drawer of your refrigerator for up to 5 days.
Freezing: For longer storage, blanch the cleaned collards in boiling water for 2-3 minutes, then plunge them into ice water. Drain well, pack in freezer bags, and freeze for up to 12 months.
Common Mistakes to Avoid When Cleaning Collards
As you learn to clean collard greens, be aware of these common mistakes:
- Not cleaning thoroughly enough: Collards can be quite dirty, so don't skimp on the cleaning process.
- Using hot water: Always use cold water, as hot water can wilt the leaves and affect their texture.
- Skipping the drying step: Excess moisture can lead to spoilage, so always dry your collards thoroughly before storing.
Creative Ways to Use Clean Collard Greens
Once you've mastered the art of cleaning collards, the culinary possibilities are endless. Here are some creative ways to use your clean collard greens:
Collard Green Wraps: Use large collard leaves as a healthy, low-carb alternative to tortillas for wraps and sandwiches.
Green Smoothies: Add a handful of clean collards to your favorite smoothie recipe for a nutrient boost.
Collard Green Chips: Toss cleaned collard leaves with olive oil and seasonings, then bake for a healthy snack.
Stir-fries: Add chopped collards to your favorite stir-fry recipes for added nutrition and texture.
Soups and Stews: Collards add hearty flavor and nutrition to soups and stews.
The Environmental Impact of Collard Greens
When discussing how to clean collards, it's worth considering the environmental impact of these nutritious greens. Collard greens are generally considered a sustainable crop, requiring less water and fewer pesticides than many other vegetables. However, the carbon footprint of your collards can vary depending on how they're grown and transported.
To minimize your environmental impact:
- Choose locally grown collards when possible
- Opt for organic collards to reduce pesticide use
- Consider growing your own collards if you have the space
Conclusion
Cleaning collard greens may seem like a simple task, but as we've seen, there's more to it than meets the eye. By following the steps outlined in this guide, you can ensure that your collards are not only clean and safe to eat but also at their peak in terms of flavor and nutrition.
Remember, the key to perfectly clean collards is patience and thoroughness. Don't rush the process, and always give your greens a final visual inspection before cooking. With practice, you'll become a pro at cleaning collards, opening up a world of culinary possibilities with this versatile and nutritious vegetable.
So, the next time you find yourself wondering, "How do you clean collards?" remember this guide and approach the task with confidence. Your taste buds – and your body – will thank you for the extra effort!