Mastering Thermal Coupling Replacement: Your Complete Guide To Water Heater Maintenance
Have you ever experienced the frustration of your water heater suddenly refusing to stay lit? That persistent clicking sound followed by the pilot light going out again and again is often a sign of a failing thermal coupling. This small but crucial component acts as a safety device, ensuring that gas flows to your burner only when the pilot light is active. Understanding how to replace a thermal coupling can save you from cold showers and expensive service calls.
Understanding Thermal Couplings in Water Heaters
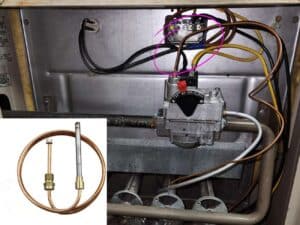
Thermal couplings, also known as thermocouples, serve as the safety mechanism in your water heater's gas control system. These devices generate a small electrical current when heated by the pilot flame, which keeps the gas valve open. When the pilot light goes out, the thermal coupling cools and stops producing electricity, automatically shutting off the gas supply to prevent dangerous gas buildup.
The typical lifespan of a thermal coupling ranges from 5 to 10 years, though this can vary based on water quality, usage patterns, and environmental conditions. Hard water areas may experience shorter lifespans due to mineral buildup and corrosion. Understanding when and how to replace this component is essential for maintaining your water heater's reliability and safety.
- Nude Photos And Secret Affairs Inside The Scandalous World Of Mormon Wives
- Leaked Princess Dianas Car Accident Was A Royal Murder Plot See The Shocking Proof
- Porn Scandal Rocks Dancing With The Stars Wicked Nights Secret Footage Leaked
Signs Your Thermal Coupling Needs Replacement
Recognizing the symptoms of a failing thermal coupling can help you address problems before they escalate. The most common indicator is when your pilot light won't stay lit after releasing the control knob. You might notice the pilot flame appears weak or yellow instead of strong and blue. Sometimes, the water heater will fire up initially but shut down shortly after, leaving you with cold water.
Other warning signs include difficulty lighting the pilot light, the need to hold the control knob down for extended periods, or the presence of a sulfur-like smell near your water heater. If you notice any of these symptoms, it's time to consider replacing your thermal coupling before complete failure occurs.
Tools and Materials Needed for Replacement
Before beginning the replacement process, gather all necessary tools and materials. You'll need a new thermal coupling specific to your water heater model, an adjustable wrench, a screwdriver set, pipe thread sealant, and a soft cloth for cleaning. Having a flashlight handy will help you see into tight spaces around the burner assembly.
- Bobbi Kristina Browns Death Shocking Leak Exposes Hidden Truths
- Exclusive Lebron James Sons Real Age Revealed In Wild Scandal Must See
- Trolls Movies Sex Scandal Leak How Many Films Are They Hiding From You
Safety equipment is crucial. Wear protective gloves to shield your hands from sharp edges and potential hot surfaces. Safety glasses will protect your eyes from debris when working in confined spaces. Keep a fire extinguisher nearby as a precaution when working with gas appliances.
Safety Precautions Before Starting
Working with gas appliances requires careful attention to safety protocols. First, turn off the gas supply to your water heater using the shut-off valve located near the unit. This valve should be perpendicular to the gas line when in the closed position. Next, turn off the water supply to prevent any pressure buildup during the replacement process.
Allow the water heater to cool completely if it has been recently used. Hot surfaces can cause severe burns, and residual heat may affect the new thermal coupling's performance. Ensure proper ventilation in your work area by opening windows or using fans to circulate fresh air.
Step-by-Step Replacement Process
Begin by removing the burner assembly access panel, typically located at the bottom of the water heater. This panel may be held in place by screws or clips, depending on your model. Once exposed, you'll see the burner, pilot light, and thermal coupling assembly.
Carefully disconnect the old thermal coupling from the gas control valve. This connection is usually a threaded fitting that requires gentle turning counterclockwise. Note the routing of the thermal coupling and how it's positioned near the pilot light. This positioning is critical for the new component's proper function.
Remove the burner assembly by unscrewing the mounting screws or brackets. This will give you better access to the thermal coupling's connection point near the pilot light. Gently pull the old thermal coupling free, being careful not to damage surrounding components.
Install the new thermal coupling by threading it into the gas control valve. Use pipe thread sealant on the threads to ensure a proper seal. Route the new thermal coupling following the same path as the old one, positioning the tip in the pilot flame as the original was positioned.
Testing and Troubleshooting After Installation
After installing the new thermal coupling, reassemble the burner assembly and secure all mounting hardware. Turn the gas supply back on and follow your water heater's lighting instructions carefully. Hold the control knob in the pilot position for the recommended time, usually 30-60 seconds, to allow the new thermal coupling to heat up and generate sufficient electrical current.
If the pilot light won't stay lit, check the positioning of the thermal coupling tip in the pilot flame. It should be in the upper third of the flame where temperatures are highest. Verify all gas connections are tight and there are no leaks by applying soapy water to connections and watching for bubbles.
Common Mistakes to Avoid During Replacement
One frequent error is failing to properly position the thermal coupling in the pilot flame. The tip must be in the hottest part of the flame for optimal performance. Another common mistake is overtightening connections, which can damage threads or crack components. Use only the force necessary to create a secure seal.
Neglecting to clean the pilot assembly before installing the new thermal coupling can lead to poor performance. Dust, debris, and corrosion can interfere with proper flame characteristics. Also, using the wrong size or type of thermal coupling for your specific water heater model will result in failure.
Maintenance Tips for Extended Component Life
Regular maintenance can significantly extend the life of your new thermal coupling. Annually inspect and clean the pilot assembly, removing any dust or debris that could affect flame quality. Check for corrosion on the thermal coupling and surrounding components, addressing any issues promptly.
Consider having your water heater professionally serviced every few years, especially if you live in an area with hard water. Professional technicians can identify potential problems before they cause system failures. Keeping your water heater area clean and free from flammable materials also contributes to safe, reliable operation.
When to Call a Professional
While many homeowners can successfully replace a thermal coupling, certain situations warrant professional assistance. If you smell gas at any point during the process, evacuate immediately and contact your gas company. Complex water heater configurations or integrated systems may require specialized knowledge for proper repair.
If you're uncomfortable working with gas appliances or lack the necessary tools, professional service is the safest option. Additionally, if your water heater is under warranty, attempting repairs yourself might void coverage. Professional technicians have the expertise to diagnose underlying issues that might be causing thermal coupling failure.
Cost Comparison: DIY vs. Professional Service
The cost of a thermal coupling typically ranges from $10 to $30 for the part alone. Professional service fees can range from $150 to $300, depending on your location and the complexity of the job. While DIY replacement offers significant savings, factor in the value of your time and the potential risks of improper installation.
Consider that professional service includes proper disposal of old components, verification of system integrity, and often a warranty on the work performed. For those with limited experience or confidence in their abilities, the additional cost of professional service may be worthwhile for the peace of mind it provides.
Conclusion
Replacing a thermal coupling on your water heater is a manageable task for many homeowners, offering both cost savings and the satisfaction of maintaining your home's essential systems. By understanding the function of this critical safety component and following proper procedures, you can restore your water heater's reliable operation and avoid inconvenient cold showers.
Remember that safety should always be your top priority when working with gas appliances. If you're ever uncertain about any aspect of the replacement process, don't hesitate to call a qualified professional. With proper maintenance and timely replacement of worn components, your water heater will continue to provide reliable hot water for years to come.