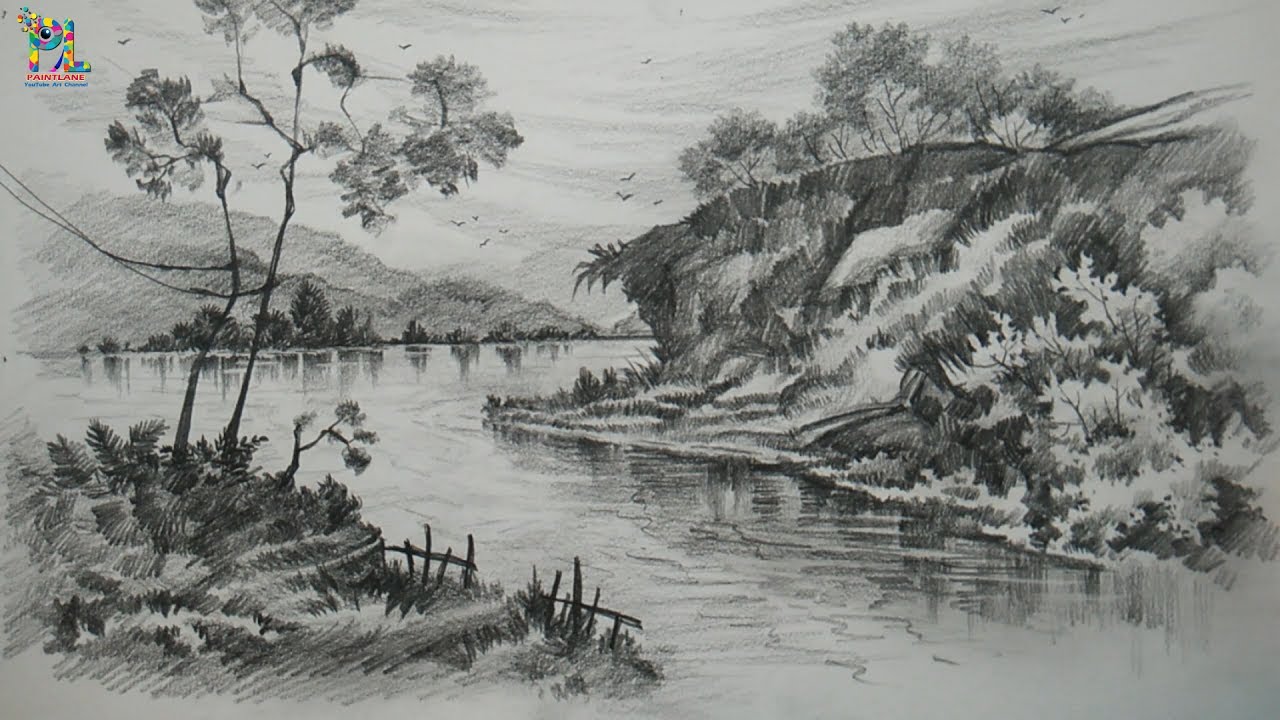
Mastering Pencil Landscape Drawing: A Complete Guide To Creating Stunning Nature Art
Have you ever wondered how artists create such breathtaking landscape drawings with just a simple pencil? The magic of pencil landscape drawing lies in its ability to capture the essence of nature through shades, textures, and composition. Whether you're a complete beginner or looking to refine your skills, this comprehensive guide will walk you through everything you need to know to create stunning landscape drawings that could potentially catch the eye of Google Discover's algorithm.
What Makes Pencil Landscape Drawing So Appealing?
Pencil landscape drawing offers a unique blend of simplicity and complexity that attracts artists of all skill levels. Unlike other mediums that require multiple tools and materials, pencil drawing relies on a single instrument to create depth, texture, and emotion. The monochromatic nature of pencil art forces artists to focus on value, contrast, and composition rather than getting distracted by color choices.
The appeal also lies in its accessibility. All you need is a pencil, paper, and eraser to begin your artistic journey. This low barrier to entry makes it an ideal starting point for aspiring artists who might feel overwhelmed by more complex mediums. Additionally, pencil drawings have a timeless quality that resonates with viewers, evoking a sense of nostalgia and connection to nature.
- Vanessa Nadals Secret Sex Tape Leaked Shocking Truth That Will Make You Cry
- Boyfriends Sex Scandal Leaked Tapes Implicate Megan Thee Stallions Bf
- Nude Photo Leak Shatters Whos The Boss Cast Reunion Plans
Essential Tools for Pencil Landscape Drawing
Before diving into techniques, let's explore the tools you'll need to create professional-looking landscape drawings. The right equipment can significantly impact your results and overall experience.
Choosing the Right Pencils
When it comes to pencil landscape drawing, not all pencils are created equal. You'll want to invest in a range of graphite pencils with different hardness levels:
- 2H to 4H: Hard pencils for light, precise lines and initial sketches
- HB to 2B: Medium pencils for general drawing and mid-tones
- 4B to 6B: Soft pencils for dark areas, shadows, and rich textures
- 8B and above: Very soft pencils for the darkest areas and dramatic effects
A quality pencil set typically includes 6-12 different grades, giving you the versatility needed for various landscape elements.
- Nude Photos From The Conjurings Real Investigation Leaked This Is 100 Real
- Pam Bondis Nightmare What Trump Secretly Posted On Truth Social Has Everyone Talking
- Charlize Therons Shocking Secret Forcing Sons To Become Daughters Exposed
Paper Selection
The paper you choose plays a crucial role in your final artwork. For landscape drawing, consider these options:
- Smooth Bristol paper: Ideal for detailed work and clean lines
- Textured drawing paper: Creates interesting effects and holds graphite well
- Toned paper: Adds depth and can reduce the amount of shading needed
- Watercolor paper: Provides excellent texture for natural elements
Basic Techniques for Pencil Landscape Drawing
Now that you have your tools ready, let's explore the fundamental techniques that form the foundation of successful landscape drawings.
Understanding Value and Contrast
Value refers to the lightness or darkness of a color, and in pencil landscape drawing, it's everything. Creating a full range of values from pure white to deep black is essential for realistic landscapes. Start by practicing value scales, gradually transitioning from light to dark.
Contrast, the difference between light and dark areas, helps create depth and dimension. In landscapes, you'll often find the highest contrast in the foreground, with values becoming closer together in the background. This technique helps create the illusion of atmospheric perspective.
Mastering Different Pencil Strokes
Different strokes create different effects in your landscape drawings:
- Hatching: Parallel lines used to create value and texture
- Cross-hatching: Layers of hatching at different angles for darker areas
- Stippling: Dots to create texture and value
- Scribbling: Loose, random strokes for natural textures
- Blending: Smoothing transitions between values using tools like tortillons or your fingers
Creating Texture in Nature Elements
One of the most challenging aspects of pencil landscape drawing is rendering realistic textures for various natural elements:
Trees and foliage: Use a combination of scribbling and stippling techniques. Vary your pencil pressure and stroke direction to create depth and volume. Remember that leaves and branches have different values based on their position relative to the light source.
Water: Water requires careful observation of reflections and movement. Use smooth, horizontal strokes for calm water, and more dynamic, curved strokes for moving water. Create highlights by leaving areas of white paper or using an eraser.
Rocks and mountains: Build up layers of graphite to create the three-dimensional form of rocks. Pay attention to light source and create shadows that follow the contours of the surface.
Clouds: Use a light touch and blending techniques to create soft, fluffy clouds. Leave areas of white paper for the brightest parts, and gradually build up darker areas where shadows fall.
Composition and Planning Your Landscape Drawing
A well-composed landscape drawing guides the viewer's eye through the scene and creates a pleasing visual balance. Before putting pencil to paper, consider these compositional elements:
The Rule of Thirds
Divide your paper into a 3x3 grid and place key elements along these lines or at their intersections. This creates a more dynamic and interesting composition than centering everything.
Creating Depth with Atmospheric Perspective
Atmospheric perspective is crucial in pencil landscape drawing. As objects recede into the distance, they appear lighter, less detailed, and often cooler in tone. Implement this by:
- Reducing contrast in distant elements
- Using lighter pencil grades for background elements
- Decreasing detail and texture in far-off objects
- Creating a gradual transition from dark to light values
Leading Lines and Focal Points
Guide the viewer's eye through your landscape using natural leading lines like rivers, paths, or tree lines. Establish a clear focal point where you want the viewer to focus their attention. This could be a striking tree, a mountain peak, or an interesting rock formation.
Step-by-Step Process for Creating a Landscape Drawing
Let's walk through a complete process for creating a pencil landscape drawing, from initial concept to final touches.
Step 1: Reference Gathering and Planning
Start by collecting reference photos or making sketches on location. Look for interesting compositions, lighting conditions, and subjects that inspire you. Plan your drawing by creating thumbnail sketches to work out composition and value arrangements.
Step 2: Creating the Initial Sketch
Begin with a light sketch using a hard pencil (2H or 3H). Focus on basic shapes and proportions rather than details. This is your foundation, so take time to get the composition right before moving forward.
Step 3: Establishing Major Values
Identify the darkest and lightest areas in your reference and begin blocking in these values. Use a medium pencil (HB or 2B) to establish mid-tones. Work from general to specific, building up the drawing gradually.
Step 4: Developing Details and Textures
Once your basic values are established, begin adding details and textures. Work on one area at a time, bringing it to a near-complete state before moving to the next section. Pay attention to how different elements interact and create transitions between them.
Step 5: Refining and Final Touches
Evaluate your drawing as a whole and make adjustments as needed. Enhance contrast where necessary, refine edges, and add final details. Consider using a kneaded eraser to lift graphite for highlights or create subtle textures.
Common Challenges in Pencil Landscape Drawing and How to Overcome Them
Even experienced artists face challenges when creating landscape drawings. Here are some common issues and solutions:
Struggling with Proportions
Use the grid method or comparative measuring to ensure accurate proportions. Hold your pencil at arm's length to measure relationships between different elements in your reference.
Difficulty Creating Depth
Practice atmospheric perspective techniques and be bold with your value range. Don't be afraid to make distant elements very light and foreground elements very dark.
Overworking the Drawing
Know when to stop. Overworking can make a drawing look muddy and lose its freshness. Take breaks and come back with fresh eyes to evaluate your progress.
Lack of Confidence with Values
Practice value scales regularly and study how light interacts with different surfaces. Train your eye to see subtle value differences in your reference material.
Advanced Techniques for Professional-Looking Results
Once you've mastered the basics, consider these advanced techniques to elevate your pencil landscape drawing skills:
Using Different Pencil Grades Strategically
Learn to use the full range of pencil grades available to you. Hard pencils for initial sketches and fine details, soft pencils for rich darks and bold textures. Understanding when and how to switch between grades is crucial for professional results.
Creating Dramatic Lighting Effects
Experiment with different lighting scenarios to create mood and drama in your landscapes. Backlighting can create beautiful silhouettes, while side lighting emphasizes texture and form. Practice rendering different times of day and weather conditions.
Incorporating Mixed Media
Consider combining pencil with other media like ink, watercolor washes, or white charcoal to create unique effects. These combinations can add depth and interest to your landscape drawings.
Developing Your Personal Style
As you gain experience, you'll naturally develop your own artistic voice. Experiment with different approaches to mark-making, composition, and subject matter to find what resonates with you.
Practice Exercises to Improve Your Skills
Consistent practice is key to improving your pencil landscape drawing abilities. Here are some exercises to incorporate into your routine:
Value Studies
Create quick value studies of different landscape elements. Focus on capturing the essence of the subject without getting caught up in details. This builds your ability to see and render values accurately.
Texture Libraries
Create a reference library of different textures you encounter in nature. Practice rendering tree bark, water, clouds, grass, and other elements separately before combining them in complete landscapes.
Timed Sketches
Set a timer for 10-30 minutes and create quick landscape sketches. This forces you to work efficiently and make decisions quickly, improving your overall workflow.
Master Copies
Study and copy works by master landscape artists. This helps you understand their techniques and thought processes, which you can then apply to your own work.
Conclusion
Pencil landscape drawing is a rewarding artistic pursuit that combines technical skill with creative expression. By understanding the fundamentals of value, composition, and technique, you can create stunning landscape drawings that capture the beauty of the natural world. Remember that improvement comes with consistent practice and a willingness to learn from both successes and mistakes.
Whether you're drawing for personal enjoyment or aspiring to share your work with a wider audience through platforms like Google Discover, the key is to stay curious and keep exploring. Each landscape offers new challenges and opportunities for growth, making this art form endlessly fascinating. So grab your pencils, find some inspiring reference material, and start creating your own beautiful landscape drawings today!