The Ultimate Guide To Perfect Oven Toaster Bread: From Basics To Artisan Loaves
Have you ever wondered why your homemade bread never quite matches the bakery-quality loaves you dream about? The secret might be simpler than you think—it's all about understanding your oven toaster and mastering a few key techniques. Whether you're a complete beginner or looking to elevate your bread-making skills, this comprehensive guide will walk you through everything you need to know about creating perfect oven toaster bread at home.
Understanding Your Oven Toaster for Bread Making
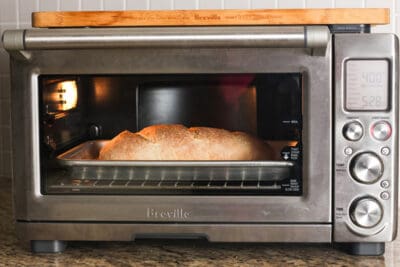
When it comes to baking bread, your oven toaster is more than just a convenient appliance—it's your partner in creating delicious, homemade loaves. Understanding how your specific model works is crucial for consistent, successful results.
Most modern oven toasters come with multiple settings that can significantly impact your bread. The bake setting provides steady, even heat from both top and bottom elements, while the convection setting uses a fan to circulate hot air, creating a crispier crust. Some models even include a steam function, which is essential for achieving that coveted artisanal crust.
- Trolls Movies Sex Scandal Leak How Many Films Are They Hiding From You
- Explosive Leak Mission Impossible 1996 Casts Hidden Scandals Exposed
- Nude Photos And Secret Affairs Inside The Scandalous World Of Mormon Wives
Temperature accuracy is another critical factor. Many oven toasters run hotter or cooler than their displayed settings, so investing in an oven thermometer can make a world of difference. This small tool ensures your bread bakes at the precise temperature needed for proper rising and crust development.
Essential Equipment and Ingredients for Perfect Bread
Before you begin your bread-making journey, gathering the right tools and ingredients will set you up for success. Quality equipment doesn't need to be expensive, but having the basics will make the process much more enjoyable.
Essential Equipment:
- Breaking Ed Geins Leaked Confessions Expose His Nude Rituals
- Handmaids Tale Stars Break Down The Emotional Breakdowns No One Talked About
- Nude Photo Leak Shatters Whos The Boss Cast Reunion Plans
- Mixing bowls (various sizes)
- Digital kitchen scale (for precise measurements)
- Dough scraper
- Bread lame or sharp knife for scoring
- Baking stone or steel (for even heat distribution)
- Dutch oven (for artisan-style loaves)
- Cooling rack
- Oven thermometer
Key Ingredients:
- High-quality bread flour (higher protein content = better structure)
- Active dry or instant yeast
- Salt (enhances flavor and controls fermentation)
- Water (filtered is best)
- Optional: sugar, butter, eggs, or milk for enriched doughs
Basic Bread Making Techniques: From Dough to Oven
Mastering the fundamentals of bread making is essential before attempting more complex recipes. The process follows a logical sequence that, once understood, becomes second nature.
Mixing and Kneading:
Start by combining your ingredients in the correct order. For most bread recipes, you'll mix flour, yeast, and salt first, then add water. Kneading develops gluten, which gives bread its structure. You can knead by hand (about 10-15 minutes) or use a stand mixer with a dough hook attachment.
Fermentation and Proofing:
After kneading, the dough needs time to rise. This fermentation process allows yeast to produce carbon dioxide, creating air pockets that give bread its light texture. Most recipes require two rises: the first (bulk fermentation) until the dough doubles in size, and the second (proofing) after shaping.
Shaping and Scoring:
Proper shaping creates surface tension, helping your loaf maintain its form during baking. Scoring the top of your loaf isn't just decorative—it allows the bread to expand properly in the oven without bursting at the seams.
Troubleshooting Common Bread Making Problems
Even experienced bakers encounter challenges. Understanding common issues and their solutions will help you improve with each attempt.
Dense or Heavy Bread:
If your bread turns out dense, several factors could be at play. Under-kneading prevents proper gluten development, while insufficient rising time means the yeast hasn't had enough opportunity to create air pockets. Additionally, using water that's too hot can kill the yeast, preventing any rise at all.
Uneven Baking:
Uneven browning or baking often results from hot spots in your oven toaster. Rotating your bread halfway through baking and using a baking stone can help distribute heat more evenly. Incorrect rack positioning can also cause issues—the middle rack typically provides the most consistent results.
Poor Crust Development:
A lackluster crust might indicate insufficient steam during the initial baking phase. Professional bakeries use steam injection ovens, but you can mimic this at home by placing a pan of hot water in the bottom of your oven or spraying the oven walls with water before loading your bread.
Advanced Techniques for Artisan-Style Loaves
Once you've mastered the basics, you can explore techniques that elevate your bread to artisan-level quality. These methods require more time and attention but reward you with exceptional flavor and texture.
Autolyse Method:
This technique involves mixing just flour and water and letting it rest for 20-60 minutes before adding yeast and salt. Autolyse improves gluten development and makes the dough easier to handle, resulting in better texture and flavor.
Stretch and Fold vs. Traditional Kneading:
Instead of vigorous kneading, the stretch and fold technique involves gently stretching the dough and folding it over itself at regular intervals during the first rise. This method develops gluten while preserving more air bubbles, creating an open, irregular crumb structure characteristic of artisan breads.
Long, Cold Fermentation:
Refrigerating your dough for 12-72 hours slows yeast activity, allowing enzymes to break down starches into simpler sugars. This process develops complex flavors that can't be achieved with quick rises and makes the dough easier to handle.
Creative Variations: Beyond Basic Bread
Once comfortable with traditional loaves, experimenting with different flavors and styles keeps bread making exciting and delicious.
Herb and Cheese Breads:
Adding fresh herbs like rosemary, thyme, or basil to your dough creates aromatic breads perfect for sandwiches or alongside soups. Hard cheeses like Parmesan can be mixed directly into the dough, while soft cheeses work better as fillings or toppings.
Sweet and Specialty Breads:
Cinnamon raisin bread, chocolate chip loaves, or fruit-studded holiday breads offer delightful alternatives to savory options. These often include additional sugar, butter, or eggs, creating a richer, softer texture.
Whole Grain and Alternative Flour Breads:
Incorporating whole wheat, rye, or ancient grains adds nutritional value and unique flavors. However, these flours absorb more water and create denser breads, so recipes often require adjustments to hydration levels and may include some white flour for structure.
Storage and Preservation Tips
Proper storage ensures your homemade bread stays fresh and delicious for as long as possible. Understanding how different types of bread age helps you enjoy them at their best.
Room Temperature Storage:
Most bread stays freshest at room temperature for 2-3 days. Store in a bread box or paper bag to maintain the crust's texture. Avoid plastic bags for crusty breads, as they trap moisture and soften the crust.
Freezing Bread:
For longer storage, freezing is your best option. Slice bread before freezing so you can remove only what you need. Wrap tightly in plastic wrap and aluminum foil, or use freezer bags. Most bread maintains quality for up to 3 months when frozen properly.
Reviving Stale Bread:
Day-old bread can be refreshed by spritzing with water and warming in a 350°F oven for 5-10 minutes. This reintroduces moisture and recrisps the crust. Alternatively, stale bread makes excellent croutons, breadcrumbs, or French toast.
Conclusion
Making perfect oven toaster bread is a journey that combines science, art, and a bit of patience. From understanding your equipment to mastering advanced techniques, each step builds your skills and confidence. The beauty of bread making lies not just in the final product but in the process itself—the tactile pleasure of working with dough, the anticipation during rising, and the satisfaction of pulling a golden loaf from your oven.
Remember that even "failed" loaves often taste delicious, and each baking experience teaches you something new. Start with simple recipes, practice consistently, and don't be afraid to experiment. Before long, you'll be creating bakery-quality breads that fill your home with irresistible aromas and bring joy to everyone who shares them. Happy baking!