Ground Rod Installation: The Complete Guide To Proper Grounding
Have you ever wondered why your electrical system needs that mysterious metal rod sticking out of the ground? Ground rod installation is a critical yet often overlooked aspect of electrical safety that protects your home, equipment, and most importantly, your life. Without proper grounding, electrical systems become dangerous hazards waiting to cause damage or injury.
Whether you're a homeowner, electrician, or DIY enthusiast, understanding the fundamentals of ground rod installation is essential. This comprehensive guide will walk you through everything you need to know about installing ground rods correctly, from the basic principles to advanced techniques that ensure optimal electrical safety.
Understanding Ground Rod Basics
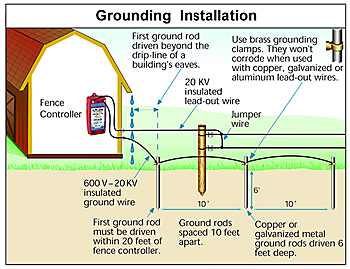
A ground rod is a long metal rod, typically made of copper or galvanized steel, that's driven deep into the earth to create a path for electrical current to safely dissipate into the ground. Think of it as a safety valve for your electrical system - when something goes wrong, the ground rod provides a safe escape route for excess electricity.
- Nude Tapes And Tragic Endings The Dark Truth About Young Actors Who Died Too Soon Leaked
- Meghan And Lilibets Beekeeping Nightmare Leaked Photos Reveal Royal Scandal
- Trolls Movies Sex Scandal Leak How Many Films Are They Hiding From You
The concept behind ground rods is simple: electricity always seeks the path of least resistance to reach the ground. By providing a dedicated, low-resistance path, ground rods prevent electrical faults from causing fires, equipment damage, or electric shocks. They're the unsung heroes of electrical safety, working silently beneath our feet to keep us protected.
Selecting the Right Ground Rod
Choosing the appropriate ground rod is crucial for effective grounding. The most common types are copper-bonded steel rods, solid copper rods, and galvanized steel rods. Copper-bonded steel rods are particularly popular because they combine the conductivity of copper with the strength of steel, offering an excellent balance of performance and durability.
When selecting a ground rod, consider factors like soil conditions, local building codes, and the specific electrical system requirements. The rod's length is also important - standard ground rods are typically 8 feet long, though 10-foot rods are available for areas with high soil resistivity. The diameter usually ranges from 1/2 inch to 3/4 inch, with thicker rods offering better conductivity and durability.
- Handmaids Tale Stars Break Down The Emotional Breakdowns No One Talked About
- Gary Colemans Secret Sex Tape Leaked Linked To His Sudden Death
- Explosive Leak Exposes Will Amp Grace Stars Banned On Set Romance
Preparing for Installation
Before you begin the installation process, proper preparation is essential. First, check local building codes and electrical regulations, as requirements can vary by location. You'll need to obtain any necessary permits before proceeding with the installation. Safety should be your top priority, so ensure you have the right protective equipment, including gloves, safety glasses, and appropriate footwear.
Next, gather all necessary tools and materials. You'll need the ground rod itself, a ground rod driver or sledgehammer, a ground rod clamp, grounding wire, and appropriate connectors. A shovel or post-hole digger might also be helpful for preparing the installation site. Consider the location carefully - ground rods should be installed at least 2 feet away from the foundation and in an area with moist soil, as dry soil has higher resistance.
Step-by-Step Installation Process
The installation process begins with selecting the optimal location. Choose a spot near your electrical service entrance but away from underground utilities. Call your local utility locating service to mark any buried lines before you start digging. Once you've identified a safe location, prepare the site by clearing away vegetation and debris.
Start by driving the ground rod vertically into the soil using a ground rod driver or sledgehammer. If you're using a sledgehammer, be extremely careful to avoid bending the rod. Keep the rod as straight as possible as you drive it down. The goal is to bury the entire rod, leaving only the top few inches exposed above ground level. In rocky or compacted soil, you might need to dig a pilot hole first or use a water jet to soften the soil.
Connecting the Grounding Wire
Once the ground rod is properly installed, the next crucial step is connecting the grounding wire. This wire, typically made of copper and often called the grounding electrode conductor, creates the vital link between your electrical system and the earth. The wire should be sized according to local electrical codes and the specifications of your electrical service.
Strip the insulation from the end of your grounding wire and attach it to the ground rod using a ground rod clamp. These clamps are specifically designed to create a secure, low-resistance connection between the wire and the rod. Tighten the clamp bolts securely, but be careful not to over-tighten and damage the rod or wire. The connection should be weatherproof and resistant to corrosion for long-term reliability.
Testing Ground Rod Resistance
After installation, it's crucial to test the ground rod's effectiveness. The resistance of the ground rod to earth should be as low as possible - ideally below 25 ohms, though some codes require even lower resistance for sensitive equipment. This test is performed using a ground resistance tester or earth ground tester.
To conduct the test, place two auxiliary electrodes in the ground at specific distances from your ground rod - typically 50 feet and 100 feet away. Connect the tester according to the manufacturer's instructions and take the reading. If the resistance is too high, you may need to add a second ground rod, improve soil conductivity around the rod, or consider alternative grounding methods. Remember, a high resistance ground is essentially useless for protection.
Common Installation Mistakes to Avoid
Even experienced installers can make mistakes that compromise the effectiveness of ground rod installation. One common error is driving the rod at an angle rather than vertically, which reduces its effective length and contact with soil. Another frequent mistake is using inadequate grounding wire or improper connections, which can create high-resistance points in the grounding system.
Some installers try to shortcut the process by burying the rod horizontally or using shorter rods to avoid difficult driving conditions. These approaches are not only against electrical codes but also provide inadequate grounding. Another critical mistake is failing to test the installation - you might think you've done everything correctly, but without testing, you won't know if your ground rod is actually providing the protection you need.
Maintenance and Troubleshooting
Ground rod systems require minimal maintenance, but periodic checks are still important. Inspect the visible portion of the rod and connections annually for signs of corrosion or damage. Check that the grounding wire remains securely connected and that the clamp hasn't loosened over time. In areas with highly acidic soil, you might need to replace components more frequently due to accelerated corrosion.
If you experience electrical problems or suspect your grounding system isn't working properly, conduct a resistance test. High resistance readings could indicate corrosion at connections, deterioration of the rod itself, or changes in soil conditions. Sometimes, what worked perfectly when installed may become less effective over time due to soil drying out or chemical changes in the earth around the rod.
Special Considerations for Different Applications
While the basic principles of ground rod installation remain consistent, different applications may require specific approaches. For residential installations, a single 8-foot ground rod is often sufficient, but commercial buildings or areas with poor soil conductivity might need multiple rods connected in parallel. In rocky terrain where driving a rod to the required depth is impossible, alternative methods like grounding plates or ground rings might be necessary.
For sensitive electronic equipment, a more sophisticated grounding system might be required. This could include isolated ground rods, equipotential bonding, or even chemical ground rods that use conductive compounds to improve soil conductivity. Data centers, hospitals, and industrial facilities often have specialized grounding requirements that go beyond standard residential installations.
The Importance of Professional Installation
While many homeowners feel comfortable tackling basic electrical projects, ground rod installation is one area where professional expertise is particularly valuable. Licensed electricians have the knowledge to ensure your installation meets all local codes and standards. They also have specialized tools for driving rods in difficult soil conditions and can properly test the installation to verify its effectiveness.
Professional installation becomes even more critical in complex situations, such as retrofitting grounding in older homes, dealing with unusual soil conditions, or installing grounding for specialized equipment. The cost of professional installation is minimal compared to the potential consequences of inadequate grounding - from damaged electronics to serious safety hazards.
Conclusion
Ground rod installation is a fundamental aspect of electrical safety that deserves careful attention and proper execution. From selecting the right materials to following correct installation procedures and conducting thorough testing, every step matters in creating an effective grounding system. Whether you're installing a ground rod for a new building or replacing an existing one, understanding these principles ensures your electrical system will be properly protected.
Remember that grounding isn't just about meeting code requirements - it's about protecting lives and property. A properly installed ground rod provides peace of mind, knowing that your electrical system has a reliable path to earth in case of faults or surges. By following the guidelines outlined in this article and considering professional installation when needed, you can ensure your grounding system will perform its critical safety function for years to come.