How To Sketch A Lion: A Step-by-Step Guide For Beginners And Artists
Have you ever been captivated by the majestic presence of a lion and wished you could capture that power on paper? Sketching a lion might seem intimidating at first, but with the right techniques and understanding, you can create a stunning representation of the king of the jungle. Whether you're a complete beginner or looking to refine your animal sketching skills, this comprehensive guide will walk you through everything you need to know about sketching a lion.
Understanding Lion Anatomy Before You Start
Before you begin sketching a lion, it's essential to understand the basic anatomy of these magnificent creatures. Lions have a unique skeletal structure that differs from domestic cats, with a more robust build and distinctive features that set them apart.
The lion's head is proportionally larger compared to its body, with a powerful jaw structure that houses sharp canine teeth. Their muscular shoulders and chest are particularly pronounced, especially in male lions who carry more bulk than females. The mane, exclusive to male lions, adds significant volume around the head and neck area, creating a dramatic silhouette that's crucial to capture when sketching a lion.
- Strongshocking Leak Love And Basketball Casts Private Messages Expose Hidden Romancesstrong
- Temptation Island Season 3 Leak Shocking Nude Scenes Exposed In Uncensored Footage
- You Wont Believe Whats Actually Open On Thanksgiving Number 3 Is A Game Changer
Understanding these anatomical differences will help you create a more accurate and lifelike sketch. Take time to study reference photos or observe lions at wildlife parks if possible. Notice how their powerful legs are built for both stalking and sprinting, and how their tail provides balance. These details will make your lion sketch more authentic and impressive.
Essential Materials for Lion Sketching
When sketching a lion, having the right materials can make a significant difference in your results. You don't need expensive professional supplies to start, but choosing quality tools will enhance your experience and outcomes.
For beginners, a simple set of graphite pencils ranging from 2H (hard) to 6B (soft) provides versatility for different shading techniques. A good quality sketchpad with at least 70 lb paper will prevent tearing and allow for multiple erasures. Mechanical pencils can be excellent for fine details like whiskers and fur texture.
- Corey Feldmans Shocking Dwts Performance Leaked You Wont Believe What He Did
- Shocking Nude Leak Garbage Band Lead Singer Exposed In Scandal
- Explosive Leak Mission Impossible 1996 Casts Hidden Scandals Exposed
Consider adding a kneaded eraser to your toolkit, as it's perfect for lifting graphite and creating highlights without damaging the paper. Blending stumps or tortillons help smooth transitions in shading, particularly useful for the soft fur areas and the dramatic shadows in a lion's face. If you're working on sketching a lion digitally, a drawing tablet with pressure sensitivity will give you similar control over line weight and opacity.
Basic Shapes and Proportions for Lion Sketching
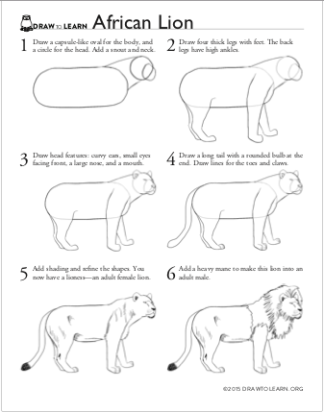
Every successful lion sketch begins with basic shapes that establish the animal's proportions and pose. Start by lightly sketching a large oval for the body and a smaller circle for the head. Connect these with simple lines representing the neck and spine.
The legs can be blocked in using rectangles, paying attention to the joints where they bend. Lions have relatively long legs compared to their body length, so ensure your proportions reflect this. For the face, draw a crosshair to help position the eyes, nose, and mouth correctly. Remember that a lion's eyes are positioned more forward on the face than many other animals, giving them that characteristic intense gaze.
When sketching a lion's mane, use wavy lines to suggest the direction and volume of the hair. The mane typically grows fuller around the neck and chest area, creating a distinctive "beard" effect. Don't worry about details at this stage—focus on getting the basic shapes and proportions correct. You can always refine and add details in later stages of your sketch.
Step-by-Step Process for Sketching a Lion's Face
The face is often the most challenging yet rewarding part of sketching a lion. Begin by establishing the basic facial structure with light guidelines. Draw a circle for the main part of the head, then add a smaller oval or teardrop shape for the muzzle.
Position the eyes along the horizontal guideline you've created. Lion eyes are relatively large and have a distinctive almond shape with round pupils. Add the nose as a triangular shape at the end of the muzzle, with the nostrils positioned at the bottom. The mouth should have a slight curve, and don't forget the small chin that gives lions their characteristic profile.
When sketching a lion's facial features, pay special attention to the ears. They're rounded rather than pointed and sit high on the head. The inner ear details can be suggested with simple curved lines. For the mane around the face, use flowing, organic lines that vary in length and direction to create a natural, wild appearance. This step-by-step approach helps build confidence as you progress through your lion sketch.
Adding Details and Texture to Your Lion Sketch
Once you have the basic structure in place, it's time to add details that bring your lion sketch to life. Start with the eyes, as they're often considered the window to the soul. Lions have beautiful amber or golden eyes with dark pupils. Add a small highlight to make them appear more realistic and alive.
The fur texture is crucial when sketching a lion. Use short, quick strokes to suggest the direction of hair growth. Lions have shorter fur on their faces and legs, becoming longer and shaggier on the mane and tail. Pay attention to how the fur changes direction around joints and along the body's contours. This attention to detail will make your sketch more three-dimensional and realistic.
For the mane, use a combination of long and short strokes to create depth and volume. Vary your pencil pressure to achieve different tones, with darker areas where the mane is thickest. Don't try to draw every single hair—instead, suggest the texture with strategic strokes that follow the natural flow of the fur. This technique is particularly effective when sketching a lion in profile or three-quarter view.
Common Mistakes to Avoid When Sketching Lions
Many beginners make similar mistakes when first sketching a lion. One common error is making the head too small in proportion to the body, which can make your lion look more like a domestic cat. Remember that lions have larger, more powerful heads relative to their body size.
Another frequent mistake is neglecting the muscular structure beneath the fur. Lions are incredibly muscular animals, and this should be evident even through their coat. When sketching a lion, use shading to suggest the underlying anatomy—the strong shoulders, the powerful haunches, and the thick neck that supports the heavy head.
Many artists also struggle with the mane, either making it too uniform or too chaotic. Study reference photos to understand how a real lion's mane grows and falls. It's typically fuller around the neck and chest, with longer tufts at the chin and behind the ears. Avoid making the mane look like a solid helmet—it should have variation in length and density to appear natural.
Advanced Techniques for Realistic Lion Sketches
As you become more comfortable with the basics of sketching a lion, you can explore advanced techniques to elevate your artwork. One powerful method is chiaroscuro, which uses strong contrasts between light and dark to create dramatic, three-dimensional effects. This technique works particularly well for lion sketches, emphasizing the animal's powerful form and the dramatic shadows created by the mane.
Consider experimenting with different mediums beyond graphite. Charcoal can create beautiful, rich blacks perfect for the darker areas of a lion's face and mane. Colored pencils or pastels can add warmth to your sketch, capturing the golden tones of a lion's coat. Some artists even combine media, using ink for bold outlines and graphite for subtle shading when sketching a lion.
Another advanced technique is capturing motion and expression. Lions are dynamic animals, and your sketch can convey their power through dynamic poses—a roaring lion, a stalking lion, or a lion in mid-roar. Study how the muscles tense and the fur moves with different actions. This level of observation will make your lion sketches more engaging and tell a story beyond just a static portrait.
Practice Exercises to Improve Your Lion Sketching
Like any skill, sketching a lion improves with practice. Start with quick gesture drawings lasting just 30 seconds to a minute. These rapid sketches help you capture the essence and movement of the lion without getting bogged down in details. Focus on the overall pose and energy rather than perfect proportions.
Progress to longer studies where you spend 10-15 minutes on a single lion sketch, paying more attention to anatomical details and shading. Use these sessions to practice specific elements—one day focus on eyes, another on manes, another on paws and claws. Breaking down the subject into manageable parts makes the learning process less overwhelming.
Consider joining online art communities or taking classes focused on animal drawing. Sharing your work and receiving feedback can accelerate your improvement when sketching a lion. Many artists find that teaching others what they've learned also deepens their own understanding. Remember that every artist develops their unique style over time, so don't be afraid to experiment and find what works best for you.
Digital Tools for Lion Sketching
In today's digital age, many artists are exploring digital tools for sketching a lion. Software like Procreate, Adobe Photoshop, or even free alternatives like Krita offer powerful features that can enhance your lion sketching experience. Digital tools provide the advantage of unlimited undos, layers for easy editing, and a vast array of brushes that can simulate different traditional media.
When sketching a lion digitally, you can use reference photos on separate layers, allowing you to trace basic shapes before developing your own interpretation. Digital color picking helps achieve accurate tones for a lion's fur, and pressure-sensitive styluses allow for natural line variation similar to traditional pencils. Many digital artists also appreciate the ability to work in layers, separating the sketch, line art, and shading stages for easier adjustments.
However, don't feel pressured to go digital if traditional methods work better for you. Many professional artists still prefer the tactile experience of pencil on paper when sketching a lion. The best approach is whichever medium allows you to express your artistic vision most comfortably and effectively.
Conclusion
Sketching a lion is a rewarding artistic journey that combines technical skill with creative expression. From understanding basic anatomy to mastering advanced shading techniques, each step brings you closer to creating a powerful representation of this majestic animal. Remember that every artist progresses at their own pace—what matters most is consistent practice and a willingness to learn from both successes and mistakes.
Whether you're sketching a lion for personal enjoyment, portfolio development, or simply to challenge yourself artistically, the skills you develop will transfer to other animal subjects and artistic endeavors. The patience, observation, and technique required for lion sketching build a foundation that enhances all your artistic work. So grab your pencils, find some inspiring reference photos, and begin your adventure in sketching a lion today. Your unique interpretation of the king of the jungle awaits!