How To Draw A Police Car: A Step-by-Step Guide For Beginners And Artists
Have you ever wanted to capture the iconic look of a police car on paper but didn't know where to start? Whether you're an aspiring artist, a parent helping your child with a school project, or simply someone who appreciates the distinctive design of emergency vehicles, learning how to draw a police car can be both fun and rewarding. Police cars are fascinating subjects with their bold colors, distinctive markings, and powerful presence that commands attention on the road.
In this comprehensive guide, we'll walk you through everything you need to know about police car drawing, from basic sketching techniques to adding those crucial details that make your drawing instantly recognizable. You'll learn about the essential elements that define a police vehicle, discover tips for achieving accurate proportions, and explore different styles from realistic to cartoon interpretations. By the end of this article, you'll have the confidence and skills to create impressive police car illustrations that capture the authority and purpose of these important emergency vehicles.
Understanding Police Car Design Elements
Before you begin your police car drawing, it's essential to understand what makes these vehicles so distinctive. Police cars typically feature several key design elements that set them apart from regular vehicles and make them instantly recognizable to the public.
- Brooks Naders Ex Husband Leaked Nude Videos Surge Online
- Shocking Leak Prairie Farms Milk Recall Covers Up Toxic Contamination
- Meghan And Lilibets Beekeeping Nightmare Leaked Photos Reveal Royal Scandal
The most obvious characteristic is the color scheme. While colors vary by jurisdiction, many police vehicles use a combination of white, black, and blue, often with bold stripes or decals running along the sides. Some departments use all-black vehicles or incorporate bright colors like yellow or orange for enhanced visibility. Understanding these color patterns will help you create authentic-looking police cars in your drawings.
Another crucial element is the emergency lighting. Police cars are equipped with flashing lights, typically mounted on the roof or integrated into the front grille. These lights often feature blue and red colors, though the specific configuration varies by region. When drawing a police car, these lights are essential for conveying the vehicle's emergency status and authority.
Police vehicles also display official markings and decals. These include the department name, badge logos, identification numbers, and sometimes slogans like "Protect and Serve." The placement of these markings follows specific patterns that contribute to the overall design aesthetic. Additionally, features like push bumpers, spotlights, and radio antennas add to the authentic police car appearance.
- Vanessa Nadals Secret Sex Tape Leaked Shocking Truth That Will Make You Cry
- Temptation Island Season 3 Leak Shocking Nude Scenes Exposed In Uncensored Footage
- Is Ariana Grande Married The Leaked Video Confirming A Scandalous Union
Essential Drawing Tools and Materials
To create your police car drawing, you'll need the right tools. While you can certainly create amazing art with just a pencil and paper, having the proper materials will make the process easier and more enjoyable.
For beginners, a good starting kit should include graphite pencils in various hardness levels (HB, 2B, 4B, and 6B). The different grades allow you to create both light construction lines and dark, bold outlines. A mechanical pencil with 0.5mm lead is also useful for fine details and consistent line work.
Paper quality matters more than you might think. Smooth drawing paper or sketch paper works well for pencil work, while slightly textured paper can add interesting effects to your finished piece. For colored drawings, consider using marker paper or mixed media paper that can handle multiple mediums without bleeding or warping.
Erasers are essential tools for any artist. A kneaded eraser is perfect for lifting graphite without damaging the paper, while a white vinyl eraser works well for more precise erasing. You might also want a battery-powered eraser for creating highlights and special effects.
For adding color to your police car drawing, consider using colored pencils, markers, or watercolor pencils. Colored pencils offer excellent control and layering capabilities, while markers provide bold, vibrant colors ideal for the bright markings on police vehicles. If you're working digitally, a drawing tablet with pressure sensitivity can give you professional results.
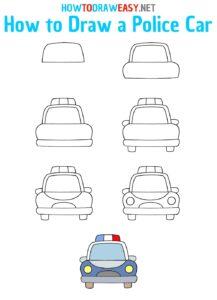
Basic Construction: Starting with Simple Shapes
Every successful police car drawing begins with basic geometric shapes that form the vehicle's foundation. This construction phase is crucial because it establishes proper proportions and ensures your final drawing looks realistic and well-balanced.
Start by drawing a large rectangle for the main body of the car. This rectangle should be slightly wider than it is tall, with the length approximately three times the height. The proportions may vary depending on whether you're drawing a sedan-style police car or an SUV-style vehicle, but this basic rectangle serves as your starting point.
Next, add a smaller rectangle on top of the first one to represent the passenger compartment. This upper rectangle should be narrower and slightly shorter than the main body, creating the characteristic "step-down" profile of most cars. The roof line should angle slightly downward from front to back, mimicking the aerodynamic shape of real vehicles.
For the wheels, draw two circles on either side of the lower rectangle. The diameter of these circles should be roughly one-seventh the length of the main rectangle. Position them so that the bottom of each circle just touches an imaginary line representing the ground. Remember that wheels appear as ellipses when viewed from an angle, so adjust their shape accordingly based on your perspective.
Add a trapezoid shape at the front to represent the hood and engine compartment. This shape should connect to the main rectangle at a slight angle, creating the forward slope of the car's front end. Similarly, add another trapezoid at the rear, though this one may be more vertical or slightly angled depending on the specific vehicle design.
Adding Details: Windows, Doors, and Features
Once you have your basic construction in place, it's time to add the specific features that transform your geometric shapes into a recognizable police car drawing. This stage is where your vehicle really starts to take shape and develop its distinct character.
Begin with the windows and windshield. Using your construction lines as guides, draw the side windows as rectangles or trapezoids that follow the angle of the roof. The windshield should be a larger trapezoid that angles back from the hood, while the rear window mirrors this angle on the opposite end. Don't forget to add the divider between the front and rear windows, which typically runs vertically between the front and rear doors.
Next, outline the doors and panels. Most police cars have four doors, so draw vertical lines to separate the front and rear sections. Add horizontal lines to indicate where the doors meet the body panels. Pay attention to the subtle curves and contours of car doors – they're rarely perfectly straight and often feature character lines that add visual interest.
Now add the front and rear details. The front grille typically has a distinctive shape that varies by vehicle model. Draw the headlights as ovals or rounded rectangles, and add any unique features like the manufacturer's emblem or push bumper. At the rear, draw the taillights, which are often larger and more angular than headlights. Include the license plate area and any rear bumper details.
For the wheels and tires, refine your initial circles into more realistic shapes. Draw the rims with multiple spokes or a solid design, depending on the vehicle type. Add tire treads and the sidewall details. Remember that tires appear slightly flattened where they contact the ground due to the vehicle's weight.
Creating the Signature Police Look
The distinctive appearance of a police car drawing comes from its unique color scheme, markings, and accessories. This is where your drawing transforms from a generic car into an authentic police vehicle that commands attention.
Start with the color blocking. Most police cars use a two-tone color scheme, typically white on top and a darker color on bottom. Use your initial construction lines to separate these color areas. The dividing line often follows the curve of the windows and doors, creating a dynamic, flowing appearance. Some departments use different colors like blue, black, or even bright yellow as the primary color.
Add the stripes and decals that run along the sides of police cars. These are usually reflective materials that create bold, eye-catching patterns. Common designs include a single stripe running from front to back, or more complex patterns that curve around the wheels or incorporate angles. These stripes are often blue, red, or a combination of both, though some departments use gold or other colors.
Include the official markings and text. Using a fine-tip pen or pencil, add the department name, typically placed on the front doors or along the sides. Include the vehicle identification number and any badge logos. Some police cars feature slogans like "Protect and Serve" or "Community First" – research the specific department you're drawing for authenticity.
Add the emergency equipment details. Draw the light bar on top of the vehicle – this is usually a black or dark gray rectangle containing multiple light compartments. Include the grille lights, which are often circular or rectangular units integrated into the front bumper. Add spotlights mounted near the side mirrors and any antennas on the trunk or roof.
Drawing Different Police Car Styles
Police departments around the world use various vehicle types, and each requires slightly different approaches in your police car drawing. Understanding these variations will help you create accurate representations of different police vehicles.
Sedan-style police cars are the most common type, based on standard passenger vehicles modified for police use. These cars have a sleek, aerodynamic profile with a clear separation between the hood, passenger compartment, and trunk. When drawing sedans, pay attention to the smooth curves and the way the roof slopes downward toward the rear. These vehicles often appear more elegant and streamlined in your drawings.
SUV-style police vehicles have become increasingly popular due to their higher visibility, more interior space, and better performance in various conditions. These vehicles have a boxier, more upright profile compared to sedans. When drawing SUVs, emphasize the taller roofline, higher ground clearance, and more vertical windshield angle. The wheels and tires are also typically larger, so adjust your proportions accordingly.
Specialized police vehicles include motorcycles, SUVs, and even trucks used by different departments. Motorcycles require a completely different approach, focusing on the two-wheel configuration, the distinctive police fairings, and the rider's position. For trucks and larger vehicles, emphasize the increased height, length, and the robust, heavy-duty appearance that these vehicles project.
Historical police cars can add interesting variety to your drawings. Vintage police vehicles from different eras have unique characteristics – 1950s cars might feature dramatic tail fins and chrome details, while 1970s vehicles often had more angular, blocky designs. Research the specific time period you want to draw to capture the authentic styling of that era.
Adding Realistic Effects and Textures
To elevate your police car drawing from good to great, consider adding realistic effects and textures that bring your artwork to life. These finishing touches can make your drawing appear more three-dimensional and professional.
Shading and lighting are crucial for creating depth and realism. Determine your light source direction and consistently apply shadows accordingly. The underside of the vehicle, areas beneath the windows, and the inner parts of wheel wells should be darker. Use gradual transitions from light to dark to create smooth gradients. For a more dramatic effect, add strong contrast between light and shadow areas.
Reflections and highlights can make your police car appear shiny and metallic. Police vehicles often have glossy paint finishes that reflect their surroundings. Add subtle highlights along the edges of body panels, on the hood, and on the roof where light would naturally catch. You can also include faint reflections of buildings, trees, or other objects in the car's surface to enhance realism.
Texture details add authenticity to specific parts of the vehicle. The tires should show tread patterns, the grille should have a mesh or bar texture, and the light bar should appear to have individual light compartments. Use different pencil pressures or pen techniques to create these varied textures. For metal parts like bumpers and trim, use short, directional strokes to suggest a brushed metal finish.
Background elements can provide context for your police car drawing. Consider adding a simple road surface with perspective lines, a building or street scene in the background, or other vehicles to create a complete scene. These elements don't need to be highly detailed – even simple suggestions can enhance the overall composition and make your police car the focal point.
Common Mistakes to Avoid
Even experienced artists can fall into common traps when creating a police car drawing. Being aware of these potential pitfalls can help you avoid them and create more successful artwork.
One frequent mistake is incorrect proportions. Many beginners make the car too short and wide, or too tall and narrow. Always refer back to your basic construction shapes and measure proportions carefully. The wheelbase (distance between front and rear wheels) is particularly important – it's often longer than beginners expect. A good rule of thumb is that the total length of the car should be about six wheel diameters.
Another common error is inconsistent perspective. When drawing a vehicle in three-quarter view, all elements must follow the same perspective lines. The wheels should appear as ellipses that align with the same vanishing point, and features like windows and doors should maintain proper angles relative to the viewer. Using a ruler or perspective grid can help maintain consistency throughout your drawing.
Overcomplicating details too early is a trap many artists fall into. Starting with complex details before establishing the basic structure often leads to a drawing that looks off-balance or awkward. Always build your drawing from simple to complex, refining the overall shape before adding individual features. This approach ensures that all elements work together harmoniously.
Neglecting the police-specific elements is a critical oversight. A drawing of a regular car with police lights on top isn't truly a police car drawing. Make sure to include the characteristic color schemes, markings, and equipment that define police vehicles. Research specific departments if you're aiming for accuracy, as different regions have different standards and traditions.
Digital Drawing Techniques for Police Cars
In today's digital age, many artists prefer creating their police car drawing using digital tools. Digital drawing offers several advantages, including the ability to easily correct mistakes, experiment with different styles, and achieve professional-looking results.
Digital drawing software like Adobe Photoshop, Procreate, or Clip Studio Paint provides powerful tools for creating detailed vehicle illustrations. These programs offer features like layers, which allow you to separate different elements of your drawing (construction lines, details, colors) and edit them independently. The undo function is invaluable for experimenting without fear of making permanent mistakes.
Using layers effectively is key to successful digital police car drawings. Start with a sketch layer for your basic construction, then add layers for line art, base colors, shadows, and highlights. This layered approach allows you to make changes to specific elements without affecting others. For example, you can adjust the color scheme or add new details without disturbing your line work.
Digital brushes and tools can help you achieve various effects efficiently. Use a hard-edged brush for clean line art, a soft brush for smooth shadows and highlights, and textured brushes for creating realistic surfaces like metal or rubber. Many programs include perspective tools that can help you maintain accurate proportions and angles throughout your drawing.
Color and lighting in digital art offer unique advantages. You can easily adjust hue, saturation, and brightness to perfect your color scheme. Digital tools also make it simple to add complex lighting effects, such as multiple light sources or environmental reflections. Experiment with different layer blending modes to create realistic shadows, glows, and metallic sheens on your police car.
Practice Exercises to Improve Your Skills
Like any skill, creating impressive police car drawings requires practice and dedication. Here are some exercises and techniques that can help you improve your abilities over time.
Gesture drawing is an excellent warm-up exercise that helps you capture the basic essence of a vehicle quickly. Set a timer for 30 seconds to 2 minutes and try to sketch a police car as accurately as possible within that time frame. This practice helps you understand proportions and develop muscle memory for drawing car shapes. Focus on capturing the overall form rather than details.
Study real police vehicles by observing photos or, if possible, real cars in your area. Pay attention to how different light conditions affect the appearance of the vehicle, how reflections work on curved surfaces, and the specific details that make each car unique. Create quick studies focusing on different aspects – one day study wheels and tires, another day focus on lighting and reflections.
Draw from different angles to expand your understanding of vehicle forms. Practice drawing police cars from front, rear, side, and three-quarter views. Each angle presents unique challenges – the front view emphasizes the grille and headlights, while the side view highlights the length and proportions. Three-quarter views are often the most challenging but also the most dynamic and interesting.
Create a series of progressive drawings where you start with a simple sketch and gradually add complexity. Begin with basic shapes, then add construction lines, outline the form, add details, and finally incorporate shading and color. Document your process to see how your skills develop over time. This methodical approach helps you understand how each stage contributes to the final result.
Conclusion
Learning how to draw a police car is a rewarding artistic journey that combines technical skill with creative expression. Throughout this guide, we've explored the essential elements that make police vehicles distinctive, from their characteristic color schemes and markings to the specific features that convey authority and purpose. We've covered everything from basic construction using simple shapes to advanced techniques for adding realistic effects and textures.
Remember that every artist develops their own style and approach over time. Don't be discouraged if your early attempts don't match your vision – even professional artists started as beginners. The key is consistent practice, careful observation of real vehicles, and a willingness to experiment with different techniques and styles. Whether you're drawing for fun, creating art for a project, or aspiring to become a professional illustrator, the skills you develop through police car drawing will serve you well in many other artistic endeavors.
As you continue your artistic journey, challenge yourself to try new perspectives, experiment with different mediums, and perhaps even create entire scenes featuring police vehicles in various contexts. The world of vehicle illustration is vast and exciting, and police cars offer a particularly engaging subject with their bold designs and important role in our communities. So grab your pencils, open your digital art program, or whatever tools you prefer, and start creating your own impressive police car drawings today!