How To Draw A Pencil: A Step-by-Step Guide For Beginners
Have you ever wondered how to draw a pencil that looks realistic and three-dimensional? Whether you're an aspiring artist, a student looking to improve your drawing skills, or simply someone who wants to learn a new creative hobby, mastering the art of drawing a pencil can be both rewarding and surprisingly challenging. In this comprehensive guide, we'll walk you through everything you need to know about creating a lifelike pencil drawing, from understanding basic shapes to adding those final touches that bring your artwork to life.
Drawing might seem intimidating at first, but with the right techniques and a bit of practice, you'll be amazed at what you can create. We'll break down the process into manageable steps, provide helpful tips and tricks, and even address common mistakes that beginners often make. By the end of this article, you'll have all the knowledge and confidence you need to draw a pencil that looks like it could jump right off the page!
Understanding the Basic Shapes of a Pencil
Before we dive into the drawing process, it's essential to understand the basic shapes that make up a pencil. A pencil isn't just a simple cylinder – it's a combination of several geometric forms that work together to create its distinctive appearance. The main body of a pencil is essentially a long, hexagonal prism (though some pencils are round), while the tip forms a cone shape where the graphite lead is exposed.
- Bobbi Kristina Browns Death Shocking Leak Exposes Hidden Truths
- Handmaids Tale Stars Break Down The Emotional Breakdowns No One Talked About
- Exposed Madea Movies Porn Leak Where To Find The Forbidden Streams Today
When you look closely at a pencil, you'll notice how these shapes interact. The hexagonal body creates six flat surfaces that catch light differently, creating highlights and shadows that give the pencil its three-dimensional quality. The cone-shaped tip tapers to a fine point, and depending on whether it's been sharpened recently or used extensively, this point can vary in length and angle. Understanding these fundamental shapes is crucial because it helps you see the pencil not as a single object, but as a collection of simpler forms that you can draw individually and then combine.
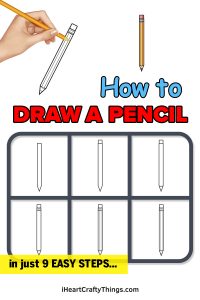
Step-by-Step Guide to Drawing a Pencil
Now that we understand the basic structure, let's walk through the step-by-step process of drawing a pencil. Start by lightly sketching a long, straight line to establish the central axis of your pencil. This line will serve as your guide and help ensure your pencil drawing maintains proper proportions and doesn't end up crooked or uneven.
Next, draw two parallel lines extending from your central axis – these will form the sides of your pencil's body. The distance between these lines should be consistent along the entire length to maintain the pencil's cylindrical shape. At one end, draw a triangle that tapers to a point – this represents the sharpened tip where the graphite lead is exposed. The other end will be slightly wider, representing the eraser holder or the end cap of the pencil.
- Corey Feldmans Shocking Dwts Performance Leaked You Wont Believe What He Did
- Shocking Leaked Sex Tape Secrets Behind Todays Celebrity Death Revealed
- This Mistletoe Murders Season 3 Twist Is So Emotional Its Breaking The Internet
Once you have these basic shapes in place, you can start adding details. Draw six vertical lines along the length of the pencil's body to create the hexagonal shape. Add the metal ferrule (the small metal piece that holds the eraser) near the eraser end, and sketch in the eraser itself. Don't forget to include any text or branding that might be printed on the pencil – these details add realism and character to your drawing.
Adding Shading and Details
The magic of creating a realistic pencil drawing lies in how you handle shading and details. Shading is what transforms a flat, two-dimensional sketch into something that appears three-dimensional and lifelike. Start by identifying your light source – this will determine where your highlights and shadows fall. Typically, you'll want to imagine the light coming from one consistent direction throughout your drawing.
Begin shading by applying light, even strokes along the length of the pencil, paying attention to the six flat surfaces of the hexagonal body. The surfaces facing away from your light source should be darker, while those facing toward it should be lighter. Use a combination of hatching (parallel lines) and cross-hatching (intersecting lines) to build up darker areas gradually. The tip of the pencil, being a cone shape, will have a smooth gradient from dark to light.
Don't forget about the small but important details that make your pencil drawing convincing. The graphite tip should appear darker and slightly reflective, while the wood body might show subtle grain patterns. The metal ferrule can have a slightly shiny appearance, and the eraser might show some texture or even slight discoloration if it's been used. These small touches add authenticity and depth to your artwork.
Common Mistakes to Avoid
Even experienced artists can fall into certain traps when drawing pencils, so it's helpful to be aware of common mistakes before you begin. One of the most frequent errors is making the pencil body too perfect or symmetrical. Real pencils have slight imperfections – maybe the wood isn't perfectly smooth, or the hexagonal shape isn't perfectly uniform along the entire length. Including these small "imperfections" actually makes your drawing more realistic.
Another common mistake is getting the proportions wrong. Pencils have specific ratios between their length, diameter, and the length of the sharpened tip. If these proportions are off, your pencil might look more like a crayon or a marker. Take time to measure and compare these elements in your reference (whether that's a real pencil or a photo). Also, be careful not to make the tip too long or too short – a typical sharpened pencil has a tip that's about 1/4 to 1/3 the length of the exposed graphite.
Many beginners also struggle with making their pencil drawings look "flat" or lacking dimension. This usually happens when the shading is too uniform or when the highlights and shadows aren't properly placed. Remember that a pencil is a three-dimensional object, so you need to create the illusion of depth through careful shading and attention to how light interacts with different surfaces.
Tips for Improving Your Pencil Drawing Skills
Like any skill, drawing improves with practice and the right techniques. One of the best ways to improve your pencil drawing skills is to practice regularly, even if it's just for a few minutes each day. Start with simple objects and gradually work your way up to more complex subjects. Drawing a pencil might seem basic, but it teaches you valuable lessons about proportion, perspective, and shading that apply to all forms of drawing.
Consider using reference materials when you're learning. This could be a real pencil placed in front of you, or high-quality photographs that show different angles and lighting conditions. Pay attention to how light falls on the object, where shadows form, and how different textures appear. You might also find it helpful to study how other artists approach pencil drawings – there are countless tutorials and demonstrations available online that can provide new insights and techniques.
Don't be afraid to experiment with different drawing tools and materials. While you might start with a simple graphite pencil, you'll eventually want to try different grades of pencils (ranging from very hard to very soft), charcoal pencils, or even colored pencils. Each medium has its own characteristics and can help you achieve different effects in your artwork. Also, consider the paper you're using – smooth paper works well for detailed work, while textured paper can create interesting effects.
Conclusion
Learning how to draw a pencil might seem like a simple task, but as we've discovered, it involves understanding basic shapes, mastering shading techniques, and paying attention to small but crucial details. By following the steps outlined in this guide and practicing regularly, you'll develop the skills needed to create realistic, three-dimensional pencil drawings that capture the essence of this everyday object.
Remember that every artist develops their own style and technique over time. What matters most is consistent practice, patience with yourself as you learn, and a willingness to experiment and make mistakes. Drawing should be an enjoyable process, not a source of frustration. As you continue to develop your skills, you'll find that the techniques you've learned from drawing a simple pencil translate to more complex subjects and open up new creative possibilities.
So grab your pencil (the drawing kind!) and some paper, and start practicing what you've learned. With time and dedication, you'll be amazed at how your drawing abilities improve and how satisfying it is to create artwork that looks remarkably realistic. Happy drawing!
![How To Draw A Pencil Step by Step- [6 Easy Phase]](https://easydrawings.net/wp-content/uploads/2020/05/How-To-Draw-A-Easy-Pencil-Step-6.png)

