How To Draw A Lily: A Step-by-Step Guide For Beginners And Artists
Have you ever admired the elegant curves and delicate petals of a lily and wished you could capture its beauty on paper? Drawing a lily might seem intimidating at first, but with the right techniques and a bit of practice, anyone can create a stunning floral masterpiece. Whether you're a complete beginner or looking to refine your skills, this comprehensive guide will walk you through everything you need to know about how to draw a lily that looks both realistic and artistically appealing.
Understanding the Lily Structure
Before you begin drawing, it's essential to understand the basic anatomy of a lily. Lilies have a distinctive structure that makes them recognizable and beautiful. The flower typically features six petals arranged in two layers, with the outer three petals slightly larger than the inner three. The petals have a graceful, curved shape that often appears to be in motion, creating a sense of elegance and fluidity.
The center of a lily contains prominent stamens with anthers at the tips, which are crucial elements to capture in your drawing. These reproductive structures add character and realism to your artwork. Additionally, lilies often have subtle veining patterns on their petals and may display gradient color transitions from the base to the tip of each petal. Understanding these structural elements will help you create a more authentic and visually appealing lily drawing.
- You Wont Believe How Andrea Willer Beat The Odds Exclusive Lotto Leak Revealed
- Explosive Viral Scandal How A Leak Destroyed Bella And Gigi Hadids Bond Forever
- Harry Potter Deaths Leaked This List Will Change How You See The Series Prepare To Cry
Essential Materials for Drawing a Lily
To get started with your lily drawing, you'll need some basic art supplies. Quality materials can make a significant difference in your final result, so it's worth investing in good tools, especially as you develop your skills.
For pencil drawing, you'll want a range of graphite pencils from 2H (hard) to 6B (soft). The harder pencils are excellent for light sketching and creating fine details, while the softer pencils help achieve darker values and rich shading. You'll also need a good eraser – both a kneaded eraser for gentle corrections and a white vinyl eraser for more precise work. Drawing paper with a smooth to medium texture works well for pencil drawings, though you can experiment with different paper types as you progress.
If you want to add color to your lily drawing, consider colored pencils, watercolors, or markers. Colored pencils offer excellent control and allow for layering colors to create realistic petal textures. Watercolors can produce beautiful, translucent effects that mimic the delicate nature of lily petals, while markers provide bold, vibrant colors for a more stylized approach.
- Shocking Leak Reveals The Exact Time Cameron Boyce Died What They Buried Will Haunt You
- Emotional Scandal Robert Irwins Hidden Romance And Sex Tapes Leaked You Wont Believe Who
- You Wont Believe This Mary Kate And Ashley Olsens Hidden Sex Scandal Finally Revealed
Basic Techniques for Drawing Flowers
Before diving into the specific steps for drawing a lily, let's cover some fundamental drawing techniques that apply to all flower drawings. These skills will form the foundation of your artistic development.
Observation is the most critical skill for any artist. Take time to really look at lilies – either from life, photographs, or reference images. Notice how the petals curve, where shadows fall, and how light affects the flower's appearance. Pay attention to proportions and relationships between different parts of the flower. This careful observation will train your eye to see details you might otherwise miss.
Light sketching is another essential technique. Start with very light, loose lines to establish the basic shapes and proportions of your lily. Don't press hard with your pencil at this stage – you want to be able to easily adjust and refine your drawing. Many artists use an "underdrawing" or "construction drawing" method, where they sketch basic geometric shapes to map out the flower's structure before adding details.
Shading brings your lily drawing to life by creating the illusion of three-dimensional form. Practice creating smooth transitions between light and dark areas using various pencil pressures and techniques like hatching, cross-hatching, and blending. Understanding how light interacts with curved surfaces will help you create realistic petal forms that appear to curve and overlap naturally.
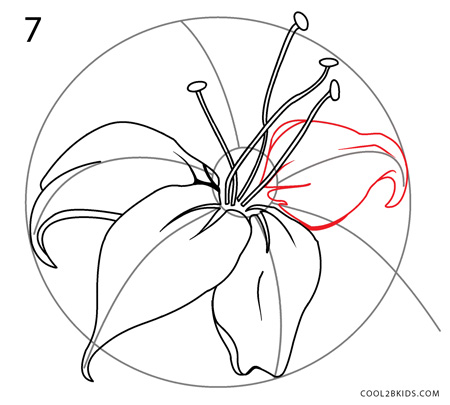
Step-by-Step Guide to Drawing a Lily
Now that you understand the basics, let's walk through a detailed step-by-step process for drawing a lily. This method is designed to be accessible for beginners while still producing professional-looking results.
Step 1: Sketch the Basic Structure
Start by lightly drawing a simple circle to represent the overall size of your lily. Inside this circle, sketch a smaller circle or oval to indicate where the flower's center will be. These guidelines help you maintain proper proportions and symmetry. Next, draw a vertical line through the center of your circles – this will serve as your central axis and help you align the petals correctly.
Step 2: Draw the Petal Guidelines
Using your central axis as a guide, lightly sketch lines to mark the positions of the six petals. Imagine the lily as having three main petals with three smaller ones alternating between them. Draw these guidelines at slightly different angles to create a natural, organic look rather than a perfectly symmetrical flower. Remember that real flowers rarely have perfect symmetry, and slight variations make your drawing more realistic.
Step 3: Define the Petal Shapes
Now begin shaping the actual petals. Start with the outer three petals, drawing curved lines that extend from the center outward. Lily petals typically have a slightly pointed tip and may curve inward or outward depending on the flower's position. Pay attention to the thickness of each petal at the base and how they taper toward the tips. The inner three petals should be slightly smaller and may sit more upright or have different curvature than the outer petals.
Step 4: Add the Center Details
Draw the prominent stamens in the center of your lily. These usually consist of long, slender filaments with small, rounded anthers at the tips. Depending on your lily variety, you might have three to six stamens. Also, sketch any additional central structures like the pistil (the female reproductive part) if visible in your reference. These center details are crucial for making your lily recognizable and adding visual interest.
Step 5: Refine the Petal Contours
Go back to your petal outlines and refine them to create more natural, flowing curves. Add subtle undulations and variations in the petal edges – real lily petals rarely have perfectly smooth outlines. Some petals might have gentle waves or slight irregularities that add character to your drawing. This is where your careful observation skills really pay off.
Step 6: Create Depth with Shading
Begin adding shading to give your lily dimension and form. Identify your light source direction and shade the areas that would naturally be in shadow – typically the undersides of petals, areas where petals overlap, and the center of the flower. Use gradual transitions from light to dark to create the illusion of curved surfaces. Pay special attention to where petals curve away from the light source.
Step 7: Add Texture and Details
Lily petals often have subtle veining patterns and may show slight imperfections or texture variations. Use your pencil to lightly indicate these details, but be careful not to overdo it – too much detail can make your drawing look busy or artificial. Focus on the most prominent veins and any distinctive markings your particular lily variety might have.
Step 8: Final Refinements
Take a step back and assess your drawing. Make any necessary adjustments to proportions, shading, or details. You might want to darken certain areas to create more contrast or soften some edges for a more natural appearance. This is also the time to erase any remaining construction lines that are still visible.
Common Mistakes to Avoid
As you learn how to draw a lily, be aware of some common pitfalls that many beginners encounter. Overworking your drawing is perhaps the most frequent mistake – constantly fussing with details can make your artwork look muddy or overworked. Know when to stop and accept that perfection isn't the goal; capturing the essence and beauty of the flower is what matters.
Another common error is creating too much symmetry. While lilies do have a radial structure, real flowers have natural variations and asymmetries that make them interesting. Don't be afraid to slightly vary petal sizes, angles, and curves to create a more organic, lifelike appearance.
Ignoring light and shadow is another mistake that can make your drawing look flat and unrealistic. Even in simple pencil drawings, understanding how light affects form is crucial for creating depth and dimension. Take time to study how shadows fall on real flowers and try to replicate those patterns in your artwork.
Advanced Techniques for Realistic Lily Drawings
Once you've mastered the basic techniques, you might want to explore more advanced methods for creating even more realistic lily drawings. Layering is a powerful technique where you build up tones gradually, starting with the lightest areas and progressively adding darker values. This approach gives you more control over the final result and creates smoother transitions.
Blending techniques can help you achieve soft, realistic petal textures. You can use blending stumps, tissue paper, or even your fingers to smooth out pencil strokes and create subtle gradations. However, be cautious not to over-blend, as some texture can add interest and realism to your drawing.
Color theory becomes important when you move beyond black and white drawings. Understanding how different colors interact, how to create realistic shadows using color rather than just darker tones, and how to capture the subtle color variations in lily petals will elevate your artwork significantly.
Digital Drawing Options
If you prefer working digitally, many of the same principles apply when learning how to draw a lily on a tablet or computer. Digital art software offers unique advantages like the ability to work in layers, easily undo mistakes, and experiment with different brushes and effects without commitment.
When drawing digitally, you might use a combination of basic shape tools to establish your structure, then switch to brush tools for the detailed work. Many artists find that digital drawing allows for greater experimentation and can be less intimidating for beginners since mistakes are easily corrected.
Practice Exercises to Improve Your Skills
Like any skill, learning how to draw a lily effectively requires practice. Here are some exercises that can help you improve:
Gesture drawing involves quickly sketching the basic forms and movement of lilies in just 30-60 seconds. This exercise trains your eye to see the essential shapes and proportions rapidly, which is invaluable for developing your artistic intuition.
Value studies focus on the light and dark patterns in your subject rather than the details. Create quick sketches that capture only the major value changes in a lily – this helps you understand form and develop your shading skills.
Detail studies involve drawing small sections of lilies in great detail – perhaps just a single petal or the center structure. These focused exercises help you understand the textures and subtle variations that make flowers interesting.
Inspiration and Reference Materials
To continue improving your lily drawings, surround yourself with inspiration and quality reference materials. Botanical illustrations from books and online resources can provide excellent examples of how professional artists approach flower drawing. Museums and botanical gardens often have collections you can study in person.
Photography can also be a valuable resource, but remember that cameras sometimes distort colors and proportions. When using photos as references, try to also observe real flowers when possible to understand their true nature.
Conclusion
Learning how to draw a lily is a rewarding artistic journey that combines observation, technique, and creative expression. From understanding the basic structure of the flower to mastering advanced shading techniques, each step brings you closer to creating beautiful, lifelike floral artwork. Remember that every artist develops their own style over time, so don't be afraid to experiment and find approaches that work best for you.
The key to success is consistent practice and patient observation. Start with simple sketches and gradually build your skills through regular drawing sessions. Study real lilies whenever possible, take reference photos, and don't be discouraged by early attempts that might not meet your expectations. With time and practice, you'll develop the ability to capture the elegant beauty of lilies on paper, creating artwork that brings joy to both you and those who view it.
Whether you're drawing for relaxation, artistic development, or to create gifts for others, the skills you develop while learning to draw lilies will serve you well in all your artistic endeavors. So grab your pencils, find some beautiful lily references, and start creating your own floral masterpieces today!