How To Draw A Lightning Bolt: A Complete Step-by-Step Guide
Have you ever struggled to capture the raw energy and power of a lightning bolt on paper? You're not alone. Many artists find this iconic symbol of electricity challenging to draw, often ending up with something that looks more like a zigzag than a realistic bolt of lightning. The good news is that with the right techniques and a bit of practice, you can master the art of drawing lightning bolts that look dynamic, powerful, and truly electrifying.
In this comprehensive guide, we'll walk you through everything you need to know about how to draw a lightning bolt, from basic shapes to advanced techniques that will make your lightning drawings pop off the page. Whether you're a beginner looking to improve your drawing skills or an experienced artist wanting to add more impact to your work, this tutorial has something for everyone.
Understanding Lightning Bolt Anatomy
Before we dive into the drawing process, it's essential to understand what makes a lightning bolt look realistic and powerful. Lightning bolts have a distinctive shape characterized by sharp, jagged lines that branch out in multiple directions. This branching pattern isn't random – it follows the path of least resistance as electricity travels through the atmosphere.
- Explosive Leak Mission Impossible 1996 Casts Hidden Scandals Exposed
- Shocking Svu Cast Sex Scandal Leaked Videos Expose Dark Secrets
- Shocking Contamination Found In Cal Yee Farm Dark Chocolate Stop Eating Now
The key elements of a lightning bolt include the main channel, which is the primary path of the electrical discharge, and the branches, which are smaller offshoots that extend from the main channel. The tips of these branches often appear to fork or split, creating a complex network of lines. Understanding this structure will help you create more authentic-looking lightning bolts in your drawings.
Essential Tools and Materials
To get started with drawing lightning bolts, you'll need some basic art supplies. While you can certainly create impressive lightning drawings with just a pencil and paper, having the right tools can make the process easier and more enjoyable. Here's what you'll need:
- Drawing paper or sketchbook (preferably with some tooth for better pencil grip)
- Pencils in various grades (HB for sketching, 2B-6B for darker lines)
- Eraser (kneaded erasers work great for lightening areas)
- Ruler (for creating straight guide lines)
- Fine-tip pens or markers for inking (optional)
- Blending tools like tortillons or cotton swabs for shading
Having quality materials will not only make the drawing process smoother but also result in a more professional-looking final piece. Don't feel pressured to buy everything at once – start with the basics and gradually build your collection as you develop your skills.
- Exclusive Jenna Ortegas Ai Generated Nudes Surface What They Revealed Will Make You Sick
- Xena Reunion Implodes By Sex Scandal Leaked Texts Expose Cast Secrets
- John Mayers Nude Photos Of Taylor Swift Leaked Heartbreaking Details Inside
Basic Lightning Bolt Shapes
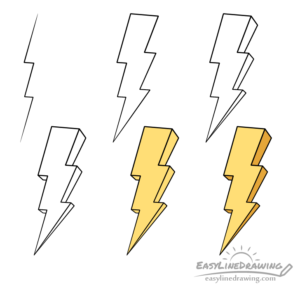
Let's start with the fundamental shapes that form the foundation of any lightning bolt drawing. The classic lightning bolt shape consists of a series of connected zigzag lines that create a sharp, angular appearance. To practice this basic shape:
- Begin by drawing a straight vertical line as your guide
- From the top of this line, draw a diagonal line to the right
- Connect this with a diagonal line to the left
- Continue this pattern, alternating directions as you move down the page
- End with a sharp point at the bottom
This creates the basic "Z" shape that's characteristic of lightning bolts. Practice this simple shape several times until you feel comfortable with the angles and proportions. Remember, lightning bolts aren't perfectly symmetrical – a bit of variation makes them look more natural and dynamic.
Creating Dynamic Lightning Effects
Once you've mastered the basic shape, it's time to add some dynamic elements that make your lightning bolts look more realistic and powerful. The key to creating dynamic lightning effects is to incorporate movement and energy into your drawing. Here are some techniques to achieve this:
Start by varying the thickness of your lines. Make the main channel of the lightning bolt thicker than the branches, and taper the lines as they extend outward. This creates a sense of depth and makes the lightning appear more three-dimensional. You can also add small, sharp points along the edges of the main channel to suggest electrical discharge.
Another effective technique is to create a sense of motion by extending small lines outward from the main bolt, as if the electricity is radiating outward. These can be short, curved lines or small zigzag patterns that suggest the intense energy of the lightning strike. Experiment with different arrangements to find what looks most natural to you.
Adding Realistic Details
To take your lightning bolt drawings to the next level, focus on adding realistic details that enhance the overall impact. One of the most important details is the branching pattern. Lightning bolts don't just travel in a straight line – they branch out in multiple directions, creating a complex network of electrical paths.
When adding branches, think about the direction of the main bolt and how the branches might naturally extend from it. Some branches might split off at sharp angles, while others might curve slightly before branching again. The key is to create a sense of randomness while maintaining a logical flow of energy.
You can also add small details like glowing edges or electrical discharge around the main bolt. This can be achieved by drawing very thin, light lines around the edges of the lightning, or by using a white pencil or gel pen to create highlights. These subtle details can make your lightning bolt look more vibrant and energetic.
Color Techniques for Lightning
While many lightning drawings are done in black and white, adding color can dramatically enhance the impact of your artwork. The most common colors for lightning bolts are bright yellow, white, and electric blue, but you can experiment with other colors to create different effects.
To color your lightning bolt, start with a base color (like yellow or white) and then add highlights and shadows to create depth. Use a slightly darker shade along the edges to suggest the three-dimensional form of the lightning, and add bright highlights where the light would be most intense.
For a more dramatic effect, try using complementary colors for the background. A dark blue or purple background can make a yellow or white lightning bolt stand out beautifully. You can also experiment with gradient backgrounds that transition from dark to light, creating a sense of depth and atmosphere.
Common Mistakes to Avoid
As you practice drawing lightning bolts, be aware of some common mistakes that can make your drawings look less realistic. One of the most frequent errors is making the lightning bolt too symmetrical or uniform. Remember, lightning is a natural phenomenon that follows unpredictable paths, so your drawing should reflect that randomness.
Another common mistake is neglecting the background or context of the lightning bolt. A lightning bolt drawn in isolation can look flat and uninteresting. Try incorporating elements like storm clouds, rain, or a night sky to give your lightning drawing more depth and atmosphere.
Finally, be careful not to overwork your drawing. Sometimes less is more when it comes to lightning bolts. A few well-placed lines can be more effective than a complex, cluttered drawing. Know when to stop and step back to evaluate your work.
Practice Exercises and Challenges
The best way to improve your lightning bolt drawing skills is through regular practice. Here are some exercises and challenges to help you develop your technique:
Timed sketches: Set a timer for 2-5 minutes and quickly sketch as many different lightning bolt shapes as you can. This helps you develop a feel for the natural variations in lightning patterns.
Branch variations: Practice drawing lightning bolts with different branching patterns. Try creating bolts with few branches, many branches, or asymmetrical branching to see how it affects the overall look.
Background integration: Draw lightning bolts in different settings – against a stormy sky, in a forest, or over a city skyline. This helps you understand how lightning interacts with its environment.
Color experiments: Try drawing lightning bolts using different color combinations. Experiment with warm colors against cool backgrounds, or monochromatic schemes to see what effects you can create.
Advanced Techniques
Once you're comfortable with the basics, you can explore more advanced techniques to create truly stunning lightning bolt drawings. One such technique is creating a sense of motion blur or energy discharge around the lightning. This can be achieved by drawing very fine, radiating lines around the main bolt, or by using a blending tool to create soft, glowing edges.
Another advanced technique is incorporating multiple lightning bolts in a single composition. This requires careful planning to ensure the bolts look natural and don't compete with each other for attention. Try creating a main lightning bolt with several smaller secondary bolts branching off from it, or multiple bolts striking different targets in the scene.
You can also experiment with different styles, from highly realistic lightning bolts based on actual photographs to more stylized or abstract interpretations. Each approach offers different creative possibilities and can help you develop your unique artistic voice.
Conclusion
Learning how to draw a lightning bolt is a journey that combines technical skill with creative expression. By understanding the basic anatomy of lightning, practicing fundamental shapes, and gradually adding more complex details and effects, you can create drawings that capture the raw power and beauty of this natural phenomenon.
Remember that mastery comes with practice, so don't be discouraged if your first attempts don't look exactly as you imagined. Keep experimenting with different techniques, study reference images of real lightning, and most importantly, have fun with the process. With time and dedication, you'll be creating electrifying lightning bolt drawings that truly stand out.
Whether you're drawing for personal enjoyment, building a portfolio, or creating artwork for others, the skills you develop through learning to draw lightning bolts will serve you well in many other aspects of art and design. So grab your pencils, embrace the challenge, and let your creativity strike!