Ferrari F40 BABFT Tutorial: Mastering The Ultimate LEGO Technic Supercar
Are you ready to tackle the most iconic LEGO Technic supercar ever created? The Ferrari F40 BABFT (Build and Build For Time) tutorial is your gateway to constructing this legendary vehicle piece by piece. Whether you're a LEGO enthusiast or a Ferrari fan, this comprehensive guide will walk you through every aspect of building the F40 BABFT, from unboxing to final assembly.
Understanding the Ferrari F40 BABFT Kit
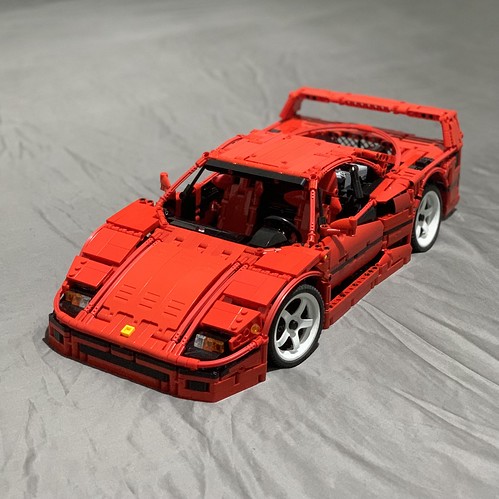
The Ferrari F40 BABFT kit is not just another LEGO set—it's a masterpiece that captures the essence of one of the most celebrated supercars in automotive history. Before diving into the build process, let's explore what makes this kit special.
What's Inside the Box?
When you first open your Ferrari F40 BABFT kit, you'll be greeted by an impressive array of components. The set typically includes:
- Leaked Princess Dianas Car Accident Was A Royal Murder Plot See The Shocking Proof
- Rory Mcilroys Marriage Secret Leaked Is He Actually Married
- Brooks Naders Ex Husband Leaked Nude Videos Surge Online
- Over 1,000 LEGO Technic pieces
- Specialized elements for the iconic rear spoiler
- Custom decals and stickers
- Detailed instruction manual with step-by-step guidance
- Unique pieces for the engine and suspension systems
The kit is designed to challenge builders of all skill levels while providing an authentic representation of the real Ferrari F40's engineering brilliance.
Key Features of the Model
The BABFT version of the Ferrari F40 comes with several notable features that make it stand out:
- Working V8 engine: The model includes a detailed replica of the F40's twin-turbocharged V8 engine that actually moves when you push the car
- Functional steering: The steering wheel controls the front wheels, just like in the real car
- Opening doors and hood: Access the interior and engine bay to admire the intricate details
- Retractable rear spoiler: One of the F40's most distinctive features is accurately represented
Essential Tools and Workspace Setup
Before starting your build, proper preparation is crucial for a smooth building experience.
- Explosive Viral Scandal How A Leak Destroyed Bella And Gigi Hadids Bond Forever
- You Wont Believe How Andrea Willer Beat The Odds Exclusive Lotto Leak Revealed
- Shocking Leak Prairie Farms Milk Recall Covers Up Toxic Contamination
Tools You'll Need
While the kit contains everything necessary for assembly, having the following tools can enhance your building experience:
- Sorting trays or containers: Organize pieces by size, color, or type to save time
- Tweezers: Help with small or hard-to-reach pieces
- Brick separator tool: Essential for removing pieces without damaging them
- Good lighting: A well-lit workspace prevents eye strain and helps identify piece colors
- Clean, flat surface: A dedicated building area keeps pieces organized
Creating the Perfect Building Environment
Your workspace setup can significantly impact your building experience:
- Choose a comfortable table or desk with enough space for the instruction manual and parts
- Ensure good ventilation, especially if you'll be building for extended periods
- Keep drinks away from your building area to prevent accidental spills
- Consider background music or a podcast to make the building process more enjoyable
Step-by-Step Building Process
Now that you're prepared, let's dive into the actual building process. The BABFT approach emphasizes efficiency and technique, so we'll cover strategies to optimize your build.
Phase 1: Foundation and Chassis (Steps 1-50)
The foundation of your F40 is critical for structural integrity:
- Start with the lower chassis by identifying and organizing all the structural beams and connectors
- Build the wheelbase according to the instructions, ensuring all axles are properly aligned
- Install the suspension components carefully, as they'll affect the car's final stance
- Tip: Group similar pieces together before starting to minimize searching time
Phase 2: Engine Assembly (Steps 51-100)
The heart of any supercar is its engine, and the F40 BABFT features a working replica:
- Begin with the engine block and work systematically through the V8 assembly
- Install the turbochargers with special attention to their orientation
- Connect the drive shafts that will link to the rear wheels
- Test the moving parts as you go to ensure smooth operation
Phase 3: Bodywork and Exterior (Steps 101-180)
This phase brings your F40 to life with its distinctive shape:
- Build the front and rear sections separately before joining them to the chassis
- Install the doors with careful alignment to ensure proper opening and closing
- Attach the iconic rear spoiler, one of the F40's most recognizable features
- Apply decals carefully using tweezers for precise placement
Phase 4: Interior and Finishing Touches (Steps 181-250)
The final phase adds the details that make your model special:
- Construct the dashboard and seats with attention to the authentic design
- Install the steering system and ensure it connects properly to the front wheels
- Add the final exterior details like mirrors, lights, and badges
- Perform a final quality check to ensure all parts are secure
Advanced Techniques for BABFT Building
The BABFT (Build and Build For Time) approach introduces efficiency techniques that experienced builders use:
Time Management Strategies
- Batch similar steps together when possible to minimize tool switching
- Pre-sort pieces for upcoming steps while waiting for glue to dry (if using adhesives)
- Use the "look ahead" technique by previewing upcoming steps to anticipate complex assemblies
Troubleshooting Common Issues
Even experienced builders encounter challenges:
- Misaligned pieces: Check your work frequently against the instructions
- Stuck pieces: Use the brick separator tool rather than forcing pieces apart
- Missing pieces: Double-check your sorted containers before assuming a piece is missing
Showcasing Your Completed F40
Once you've completed your build, it's time to display your masterpiece:
Display Options
- Clear acrylic display case: Protects your model from dust while showcasing it
- Rotating display stand: Allows viewing from all angles
- LED lighting: Highlights the model's details and creates dramatic effects
Photography Tips
Capture your completed build with these photography techniques:
- Use natural light when possible for the most accurate colors
- Experiment with different angles to showcase unique features
- Consider a plain background to make your F40 stand out
- Take close-up shots of special details like the engine or interior
Maintenance and Care
Keep your Ferrari F40 BABFT in pristine condition with proper care:
Cleaning Guidelines
- Use a soft brush to remove dust from hard-to-reach areas
- Avoid water or cleaning products that might damage stickers or delicate pieces
- Store in a cool, dry place away from direct sunlight to prevent color fading
Long-term Storage
If you need to store your model:
- Disassemble delicate parts like the spoiler if storing long-term
- Use original packaging or sturdy containers for protection
- Include silica gel packets to control moisture in storage containers
Conclusion
Building the Ferrari F40 BABFT is more than just assembling a LEGO set—it's an immersive experience that combines the thrill of supercar engineering with the satisfaction of creating something remarkable with your own hands. By following this comprehensive tutorial, you've not only built an impressive model but also developed skills that will enhance all your future building projects.
The BABFT approach teaches efficiency, attention to detail, and problem-solving skills that extend beyond LEGO building. Whether you're displaying your completed F40 proudly on a shelf or enjoying the building process itself, this iconic model represents the perfect blend of form and function that made the original Ferrari F40 a legend in automotive history.
Remember, every builder's journey is unique, and your F40 will carry the personal touches that make it distinctly yours. Happy building!