How To Draw A Jellyfish: A Step-by-Step Guide For Artists Of All Levels
Have you ever been mesmerized by the graceful movements of a jellyfish in an aquarium or ocean documentary? Their ethereal beauty and unique structure make them fascinating subjects for artists. Whether you're a complete beginner or an experienced illustrator looking to expand your repertoire, learning how to draw a jellyfish can be both rewarding and surprisingly simple. In this comprehensive guide, we'll walk you through everything you need to know to create stunning jellyfish artwork, from basic sketches to advanced techniques that will make your creations come alive on paper.
Understanding Jellyfish Anatomy and Structure
Before diving into the drawing process, it's essential to understand what makes jellyfish so unique. A jellyfish's body consists of several key components that you'll want to capture in your artwork.
The bell (or umbrella) forms the main body of the jellyfish, typically shaped like a dome or inverted cup. Beneath this bell are the oral arms and tentacles, which can vary dramatically in length, thickness, and arrangement depending on the species. Some jellyfish have hundreds of tentacles that trail behind them like delicate ribbons, while others have fewer, more prominent appendages.
- Shocking Leak Tina Turners Secret Recordings Expose Ikes Brutal Abuse Youll Never See Her The Same Way Again
- Exposed Madea Movies Porn Leak Where To Find The Forbidden Streams Today
- Breaking Ed Geins Leaked Confessions Expose His Nude Rituals
Jellyfish also have a translucent quality that allows light to pass through their bodies, creating beautiful color variations and highlights. This transparency is one of the most challenging yet rewarding aspects to capture in your drawings. Additionally, many species feature radial symmetry, meaning their structures radiate outward from a central point, which is crucial to consider when establishing your composition.
Understanding these anatomical features will help you create more realistic and visually appealing jellyfish drawings, regardless of your chosen style or medium.
Basic Supplies You'll Need
Before we begin the drawing process, let's gather the essential supplies. The good news is that you don't need expensive or specialized equipment to create beautiful jellyfish art.
- Emotional Scandal Robert Irwins Hidden Romance And Sex Tapes Leaked You Wont Believe Who
- Shocking Contamination Found In Cal Yee Farm Dark Chocolate Stop Eating Now
- Explosive Mary Kate Cornetts Secret Sex Tape Rumors Finally Confirmed
For traditional drawing, you'll want a range of pencils (HB for sketching, 2B-6B for shading), quality drawing paper or a sketchbook, a good eraser (both kneaded and vinyl work well), and optionally, fine-tipped pens for inking. If you're interested in adding color, consider colored pencils, watercolors, or markers—each can create stunning effects for jellyfish art.
For digital artists, a drawing tablet and software like Procreate, Photoshop, or Krita will work perfectly. The digital medium offers unique advantages for creating the translucent effects that make jellyfish so captivating.
Whichever medium you choose, ensure you have good reference images available. Photos of real jellyfish can be invaluable for understanding their structure and the way light interacts with their bodies. You might also want to have a scrap piece of paper for testing colors or techniques before applying them to your final piece.
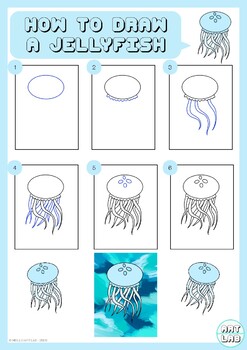
Step-by-Step Guide: How to Draw a Simple Jellyfish
Now that you're prepared with knowledge and supplies, let's walk through the process of drawing a basic jellyfish. This method is perfect for beginners and provides a solid foundation for more advanced techniques.
Step 1: Sketch the Basic Bell Shape
Start by drawing a simple dome or bell shape in the center of your paper. This doesn't need to be perfect—jellyfish in nature have organic, slightly irregular shapes. Think of it as an upside-down bowl or a rounded cap. Keep your lines light, as you'll be refining this shape.
Step 2: Add the Oral Arms
Beneath the bell, draw several flowing, ribbon-like shapes that will become the oral arms. These typically hang down from the center of the bell and can curl and twist in various directions. Remember that jellyfish move with the currents, so these arms shouldn't appear stiff or straight.
Step 3: Draw the Tentacles
Now add the tentacles extending from around the edge of the bell. These can vary in length and thickness—some may be long and thin, while others might be shorter and more substantial. Allow them to flow outward and downward, creating a sense of movement. Don't worry about making them perfectly symmetrical; slight variations will make your drawing more natural.
Step 4: Refine the Shapes
Go over your initial sketch, refining the curves and adding subtle details. You might add gentle undulations to the bell's edge or create slight variations in the thickness of the tentacles. This is where your jellyfish will start to take on character and personality.
Step 5: Add Shading and Texture
Using your pencil, begin adding shading to create depth. Pay attention to where light would naturally hit the jellyfish and where shadows would form. The underside of the bell and the areas where tentacles overlap will typically be darker. You can also add subtle texture by creating gentle, wavy lines that follow the contours of the bell.
This basic approach provides a solid foundation that you can build upon as you gain confidence and skill. Practice this method several times before moving on to more complex techniques.
Advanced Techniques for Realistic Jellyfish Drawings
Once you've mastered the basic jellyfish drawing, you might want to challenge yourself with more advanced techniques that capture the ethereal beauty of these creatures in greater detail.
Creating Translucent Effects
One of the most distinctive features of jellyfish is their translucent quality. To achieve this effect in your drawings, focus on creating smooth transitions between light and dark areas. Use your pencils or digital brushes to build up layers gradually, allowing some areas to remain lighter to suggest transparency.
Consider where your light source is coming from and how it would pass through different parts of the jellyfish. Areas where the bell is thinner might appear almost see-through, while thicker sections would be more opaque. You can create this effect by using very light pressure with your pencil or by erasing gently to create highlights.
Capturing Movement and Flow
Jellyfish appear to dance through the water, and capturing this sense of movement is crucial for realistic artwork. Pay attention to the S-curves and flowing lines in your composition. The tentacles shouldn't hang straight down but should curve and twist as if being gently pushed by water currents.
You can enhance the sense of movement by varying the thickness of lines—thicker lines can suggest areas closer to the viewer, while thinner lines recede. Also consider adding subtle ripples or waves in the background to place your jellyfish in its aquatic environment.
Adding Color and Light Effects
If you're working with color, jellyfish offer wonderful opportunities to experiment with luminous effects. Many species feature bioluminescent qualities or have beautiful color variations that change depending on the light. Consider using gel pens, white charcoal, or digital brushes to add glowing highlights that suggest bioluminescence.
For traditional media, watercolor can be particularly effective for creating the soft, translucent quality of jellyfish. Layer your colors gradually, allowing some areas to remain white or very light to suggest light passing through the creature's body.
Common Mistakes to Avoid When Drawing Jellyfish
Even experienced artists can fall into certain traps when drawing jellyfish. Being aware of these common mistakes can help you avoid them and improve your artwork more quickly.
One frequent error is making the bell too symmetrical or perfect. Remember that in nature, jellyfish have organic, slightly irregular shapes. Don't be afraid to introduce subtle variations and imperfections—they'll make your drawing more realistic.
Another mistake is drawing tentacles that are too uniform or straight. Jellyfish tentacles flow with the water, so they should have gentle curves and variations in thickness. Study reference photos to understand how tentacles actually behave in water.
Many artists also struggle with the scale and proportion of different parts of the jellyfish. The oral arms and tentacles should be in proportion to the bell—generally, they extend significantly below it. Pay attention to these relationships as you draw.
Finally, avoid making your jellyfish appear too flat. The bell should have a sense of three-dimensionality, with shading that suggests its rounded form. Similarly, the tentacles should have volume rather than appearing as simple lines.
Creative Variations: Different Jellyfish Species to Draw
The world of jellyfish is incredibly diverse, with over 2,000 known species, each with unique characteristics perfect for artistic interpretation. Exploring different species can expand your skills and keep your artwork interesting.
The Moon Jellyfish (Aurelia aurita) is an excellent subject for beginners due to its relatively simple structure and the beautiful four-leaf-clover pattern visible through its translucent bell. These are common in many aquariums and easy to find reference photos for.
Lion's Mane Jellyfish are much more complex, with a larger bell and extremely long, dense tentacles that can extend over 100 feet in nature. Drawing these impressive creatures challenges you to capture intricate details and create a sense of scale.
The Box Jellyfish has a distinctive cube-shaped bell and clusters of tentacles at each corner. Its geometric structure offers an interesting contrast to the more common dome-shaped species and can help you practice drawing angular forms.
For something truly unique, try drawing a Comb Jellyfish. These creatures don't have the typical tentacles but instead feature rows of cilia that refract light, creating rainbow-like effects. Capturing these color effects can be a wonderful exercise in using color and light in your artwork.
Digital vs. Traditional: Which Medium Works Best?
Both digital and traditional mediums offer unique advantages for drawing jellyfish, and the best choice depends on your personal preferences and artistic goals.
Traditional drawing provides a tactile experience that many artists find satisfying. The physical interaction with paper and the ability to create subtle variations in line weight with different pencils can result in artwork with a distinctive character. Traditional media also don't require any technical knowledge beyond basic drawing skills, making them accessible to everyone.
Digital drawing, on the other hand, offers several advantages for jellyfish art. The ability to create layers allows you to experiment without fear of ruining your work. Digital brushes can simulate various traditional media, and you have the option to easily adjust colors, opacity, and other properties. For creating the translucent effects that make jellyfish so captivating, digital tools can be particularly powerful, offering blending modes and transparency settings that would be difficult to achieve with traditional media.
Some artists find that combining both approaches works well—perhaps starting with a traditional sketch and then refining and coloring digitally, or using traditional watercolors for the base and adding digital details afterward.
Using Reference Photos Effectively
Reference photos are invaluable tools for creating realistic jellyfish drawings, but knowing how to use them effectively is crucial.
When selecting reference photos, look for high-quality images with good lighting that clearly shows the jellyfish's structure. Photos taken from multiple angles can help you understand the three-dimensional form of these creatures. Many aquariums and marine biology websites offer excellent, copyright-free reference photos.
Don't simply copy a single reference photo—instead, use multiple references to understand the anatomy and then create your own unique composition. This approach helps you avoid unintentional plagiarism while still benefiting from the accuracy that references provide.
Pay special attention to how light interacts with the jellyfish in your references. Note where highlights appear, how shadows form, and how the translucent quality affects the appearance of different parts of the creature. These observations will inform your shading and coloring decisions.
Remember that while references are helpful, you don't need to make your drawing an exact replica of a photograph. Artistic interpretation is valuable—you might emphasize certain features, adjust colors, or create a composition that differs from your reference while still maintaining anatomical accuracy.
Troubleshooting Common Drawing Challenges
Even with good instruction, you might encounter some challenges when drawing jellyfish. Here are solutions to some common problems artists face.
If you're struggling with making the bell look three-dimensional, try this exercise: draw several overlapping circles and practice shading them to appear as spheres. This will help you understand how to create the illusion of volume, which you can then apply to the jellyfish bell.
For tentacles that look too stiff or unnatural, try drawing them with a continuous, flowing motion rather than as individual, disconnected lines. You might also practice drawing ribbon-like shapes that twist and turn, as this mimics the natural structure of many jellyfish tentacles.
If your jellyfish appears too flat or lacks depth, examine your values (the range of lights and darks in your drawing). A common mistake is working only in the middle range of your value scale. Push your darks darker and keep your lights lighter to create stronger contrast and depth.
When working on the translucent quality, if your jellyfish looks too opaque, try lifting some graphite with your eraser or using a lighter touch with your pencil. You might also leave certain areas completely white to suggest the brightest highlights where light passes through most strongly.
Conclusion
Learning how to draw a jellyfish is a journey that combines observation, technique, and artistic interpretation. From understanding the basic anatomy to mastering advanced techniques for creating translucent effects and capturing movement, each step brings you closer to creating artwork that truly captures the ethereal beauty of these fascinating creatures.
Remember that like any skill, drawing improves with practice. Don't be discouraged if your first attempts don't match your vision—each drawing teaches you something new. Experiment with different species, try various mediums, and develop your own style as you progress.
Whether you're drawing for relaxation, building a portfolio, or simply exploring your creativity, jellyfish offer endless possibilities for artistic expression. Their unique forms challenge you to think about shape, transparency, and movement in new ways, helping you grow as an artist.
We hope this comprehensive guide has given you the confidence and knowledge to begin your jellyfish drawing journey. So grab your pencils, find some inspiring reference photos, and start creating your own beautiful interpretations of these mesmerizing ocean dwellers. The underwater world awaits your artistic exploration!