Why Isn't My Kerning Changing In Illustrator? Troubleshooting Kerning Issues
Have you ever spent hours meticulously adjusting the kerning in your Illustrator project, only to find that your changes aren't taking effect? It's frustrating when you're trying to achieve perfect typography, but the letters stubbornly refuse to budge. You're not alone—kerning issues in Adobe Illustrator are surprisingly common and can leave even experienced designers scratching their heads.
Before you pull your hair out or start questioning your design skills, take a deep breath. There are several logical explanations for why kerning might not be working as expected in Illustrator. In this comprehensive guide, we'll explore the most common culprits behind unresponsive kerning and provide you with practical solutions to get your typography back on track.
Understanding Kerning in Illustrator
Kerning refers to the adjustment of space between individual letter pairs to create visually balanced and aesthetically pleasing text. Unlike tracking, which adjusts spacing uniformly across a range of characters, kerning targets specific letter combinations that may appear too tight or too loose.
- The Dark Secret Of Kris Jenners Face Lift What Shes Hiding Will Make You Gasp
- Shocking Sex Truths For Feb 28th Birthdays Horoscope Leak Exposes Everything
- Shocking Leak Reveals The Exact Time Cameron Boyce Died What They Buried Will Haunt You
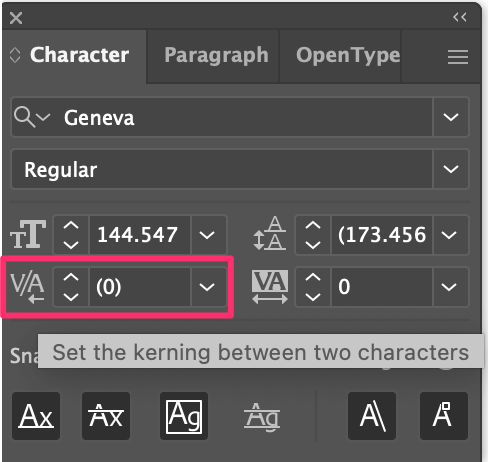
In Illustrator, kerning can be applied in several ways: through the Character panel, keyboard shortcuts, or by selecting specific kerning options like Optical or Metrics. When kerning isn't working, it typically indicates that one of these systems is being overridden by another setting or that the text is in a state that prevents manual adjustments.
Common Reasons Why Kerning Isn't Working
Text is Converted to Outlines
One of the most common reasons kerning becomes unresponsive is that your text has been converted to outlines. When you select your text and choose Type > Create Outlines (or press Ctrl/Cmd+Shift+O), the text transforms into vector shapes. While this allows for more advanced manipulation, it also means you can no longer edit the text or adjust its kerning.
If you've outlined your text and are now trying to adjust spacing between letters, you'll need to use the Selection tool to move individual letterforms manually. This is a completely different process from kerning and requires zooming in closely and using guides or smart guides to maintain consistency.
- Trolls Movies Sex Scandal Leak How Many Films Are They Hiding From You
- Pam Bondis Nightmare What Trump Secretly Posted On Truth Social Has Everyone Talking
- Shocking Leak Prairie Farms Milk Recall Covers Up Toxic Contamination
Optical vs. Metrics Kerning Settings
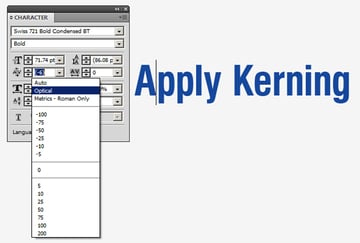
Illustrator offers two primary kerning methods: Metrics and Optical. Metrics kerning uses the built-in spacing information included with most fonts, while Optical kerning analyzes letter shapes and adjusts spacing based on their visual appearance.
Sometimes, the kerning settings you're trying to apply conflict with Illustrator's automatic kerning system. If Optical kerning is enabled but you're expecting Metrics-based adjustments (or vice versa), the results might not match your expectations. Check your Character panel to see which kerning method is currently active.
Text is Part of a Style or Effect
When text is part of a style or has various effects applied, some adjustments may be restricted. For instance, if your text is inside a text box with specific constraints, or if it's part of a complex effect chain, kerning adjustments might be limited or behave unexpectedly.
Similarly, if you're working with point text versus area text, the way kerning responds can differ. Area text (text inside a frame) might have different behavior than point text (text that doesn't wrap), especially when combined with text wrap or other layout features.
Software Glitches or Corrupted Preferences
Like any complex software, Illustrator can occasionally experience glitches. Corrupted preferences, temporary bugs, or conflicts with system resources can cause seemingly inexplicable behavior, including unresponsive kerning controls.
If you suspect this might be the issue, try resetting Illustrator's preferences (though be aware this will reset your custom workspace and settings). You can also try restarting the application or your computer to clear any temporary issues.
Font-Specific Limitations
Some fonts have built-in kerning that's either very minimal or intentionally designed to work a certain way. If you're working with a font that has limited kerning pairs or unusual spacing characteristics, you might find it difficult to achieve the adjustments you want.
Additionally, if you're using a font that's still loading or hasn't fully initialized, kerning controls might be temporarily disabled. This is more common when working with large font libraries or network-based font management systems.
Troubleshooting Steps to Fix Kerning Issues
Step 1: Verify Text Status
First, confirm that your text hasn't been converted to outlines. Select your text and look at the Character panel—if the text cursor appears when you click between letters, your text is still editable. If you see individual anchor points instead, you're working with outlines.
If your text is outlined, you have two options: either undo the outlining (if you haven't saved since) or manually adjust letter spacing using the Selection tool. For future projects, consider keeping a copy of your text layer before outlining so you can make adjustments later if needed.
Step 2: Check Kerning Method
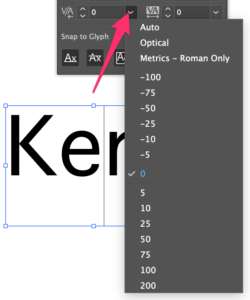
Open your Character panel and examine the kerning dropdown menu. It typically shows "Auto" by default, which uses the font's built-in kerning. You can switch between Metrics (the font's built-in kerning pairs) and Optical (Illustrator's algorithmic spacing).
Try switching between these options to see if one produces the results you want. Sometimes, Optical kerning can create more balanced spacing for problematic letter combinations, while Metrics works better for fonts with extensive built-in kerning data.
Step 3: Examine Text Type and Effects
Determine whether you're working with point text or area text. Right-click your text and check if it's part of any text threads or has text wrap applied. These features can sometimes interfere with manual kerning adjustments.
Also, check if any effects are applied to your text. Go to the Appearance panel and review the effect stack. Complex effects like 3D, warp, or stylize might be limiting your ability to adjust kerning directly.
Step 4: Reset Character Settings
Sometimes, character settings can become corrupted or locked. Try selecting your text and clicking the "Reset Character" button in the Character panel. This returns all character attributes to their default state, which might resolve kerning issues caused by conflicting settings.
You can also try selecting a different font temporarily, then switching back to your original font. This can sometimes reset the text's internal state and restore normal kerning functionality.
Step 5: Update or Restart Illustrator
If none of the above steps work, ensure you're running the latest version of Illustrator. Adobe frequently releases updates that fix bugs and improve stability. An outdated version might have known issues with kerning that have since been resolved.
If updating doesn't help, try restarting Illustrator. This simple step can clear temporary memory issues or conflicts that might be affecting the application's performance.
Step 6: Check for Conflicting Scripts or Plugins
Third-party scripts or plugins can sometimes interfere with Illustrator's normal operation. If you've recently installed any new extensions or scripts, try disabling them temporarily to see if they're causing the kerning issues.
You can also try launching Illustrator in safe mode (if available) or with plugins disabled to isolate whether an external factor is causing the problem.
Advanced Kerning Techniques and Workarounds
Using the Touch Type Tool
If standard kerning isn't working, try the Touch Type tool (the "T" with a rectangle around it in the toolbar). This tool allows you to select individual characters and manipulate them independently—you can scale, rotate, and reposition letters without affecting the rest of the text.
While this isn't true kerning, it provides a workaround for achieving custom spacing when traditional kerning controls are unresponsive. The Touch Type tool is particularly useful for creating expressive typography or fixing problematic letter combinations that resist standard kerning adjustments.
Manual Spacing with Guides
For ultimate control over spacing, you can use guides and the Selection tool to manually position letters. Create horizontal guides to establish a baseline, then use the Selection tool to nudge individual letters left or right until you achieve the desired spacing.
This method is time-consuming but gives you complete control over every aspect of your typography. It's especially useful for display text or logos where perfect spacing is critical and you need to override the font's built-in kerning.
Creating Custom Kerning Pairs
If you frequently work with a particular font and encounter the same kerning issues repeatedly, consider creating a modified version of the font with custom kerning pairs. While this requires font editing software and knowledge of font licensing, it can be worthwhile for brand identity work where consistent typography is essential.
Several font editing applications allow you to adjust or add kerning pairs, though be sure to respect the font's license agreement before making modifications.
Preventing Future Kerning Issues
Best Practices for Typography in Illustrator
To avoid kerning problems in future projects, establish a workflow that includes these best practices:
Always keep a copy of your text as editable type before applying complex effects or converting to outlines. This gives you a fallback option if you need to make adjustments later.
When working with critical typography, test your font's kerning early in the design process. Some fonts handle kerning better than others, and discovering issues early gives you time to find alternatives or plan workarounds.
Consider using Paragraph Styles and Character Styles to maintain consistent typography throughout your document. Styles can help prevent unexpected kerning changes and make it easier to update text globally.
Understanding When to Use Different Approaches
Recognize that not every text situation requires manual kerning. For body text or small sizes, the font's built-in kerning (Metrics) is often sufficient and may even be preferable to manual adjustments.
Reserve manual kerning for display text, logos, headlines, and other situations where letter spacing is visually prominent. At larger sizes, even subtle kerning issues become more noticeable, making manual adjustments more valuable.
Learning to Recognize Kerning Issues
Develop your eye for spotting kerning problems by studying well-designed typography and practicing with various letter combinations. Certain pairs—like "AV," "WA," "To," and "r" followed by rounded letters—often require manual adjustment.
Train yourself to zoom out and view your typography at different sizes and distances. What looks perfect up close might appear uneven from a normal viewing distance, and vice versa.
Conclusion
Kerning issues in Illustrator can be frustrating, but they're usually solvable once you understand the underlying causes. Whether the problem stems from text being converted to outlines, conflicting settings, software glitches, or font limitations, there's almost always a solution available.
Remember that typography is both an art and a science. While Illustrator provides powerful tools for controlling letter spacing, achieving perfect kerning often requires a combination of technical knowledge and visual judgment. Don't be afraid to experiment with different approaches, and always keep editable text copies of your work for future adjustments.
By understanding how Illustrator handles kerning and following the troubleshooting steps outlined in this guide, you'll be better equipped to handle any kerning challenges that arise in your design projects. With practice and patience, you'll develop the skills to create beautifully spaced typography that enhances your overall design work.
Have you encountered particularly stubborn kerning issues in Illustrator? What solutions have worked for you? Share your experiences in the comments below—your insights might help fellow designers struggling with similar challenges.