How To Draw A Black Hole: A Step-by-Step Guide To Creating Cosmic Art
Have you ever wondered how artists create those mesmerizing depictions of black holes that seem to pull you into their gravitational depths? Drawing a black hole might seem like an impossible task, but with the right techniques and understanding of cosmic phenomena, you can create stunning artwork that captures the mystery and beauty of these celestial objects. Whether you're an aspiring artist or just curious about the process, this comprehensive guide will walk you through everything you need to know about how to draw a black hole that looks both scientifically accurate and artistically captivating.
Understanding Black Holes Before You Draw
Before diving into the artistic process, it's essential to understand what a black hole actually is. A black hole is a region of spacetime where gravity is so strong that nothing—not even light—can escape once it crosses the event horizon. This extreme gravitational pull creates the characteristic appearance we associate with black holes: a dark center surrounded by swirling matter and distorted light.
The most famous depiction of a black hole came from the movie Interstellar, where the visual effects team created what scientists later confirmed was remarkably accurate. This representation showed the accretion disk—the bright ring of matter orbiting the black hole—appearing to bend around both sides of the black hole due to gravitational lensing, a phenomenon where massive objects warp the fabric of spacetime itself.
- Harry Potter Deaths Leaked This List Will Change How You See The Series Prepare To Cry
- Meghan And Lilibets Beekeeping Nightmare Leaked Photos Reveal Royal Scandal
- Nude Photos From The Conjurings Real Investigation Leaked This Is 100 Real
Essential Materials for Drawing a Black Hole
To begin your black hole drawing journey, you'll need the right materials. The good news is that you don't need expensive or specialized equipment to create impressive results. Here's what you'll need:
- Drawing paper or canvas - Choose a surface that can handle your preferred medium
- Pencils - A range from 2H to 6B for different shading intensities
- Erasers - Both kneaded and precision erasers for corrections
- Blending tools - Tortillons, blending stumps, or even cotton swabs
- Ruler or compass - For creating precise circular shapes
- Reference images - Scientific illustrations or photographs of space phenomena
For digital artists, a drawing tablet and software like Photoshop, Procreate, or Krita can provide additional tools and flexibility. The key is having materials that allow you to create smooth gradients and precise details.
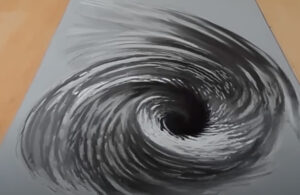
Step 1: Creating the Basic Structure
Start by establishing the fundamental structure of your black hole. Begin with a light sketch of the central singularity—the point where matter is compressed into infinite density. Draw a small, dark circle in the center of your page. This will be the core of your black hole.
- Shocking Sex Truths For Feb 28th Birthdays Horoscope Leak Exposes Everything
- Shocking Nude Leak Garbage Band Lead Singer Exposed In Scandal
- Corey Feldmans Shocking Dwts Performance Leaked You Wont Believe What He Did
Next, create the event horizon by drawing a slightly larger circle around the central point. The event horizon represents the boundary beyond which nothing can escape the black hole's gravitational pull. Make this line faint, as it's more of a conceptual boundary than a visible feature.
Now, sketch the accretion disk by drawing concentric rings around the event horizon. These rings should appear elliptical rather than perfectly circular, as we're viewing the black hole from an angle. The accretion disk consists of matter—gas, dust, and other debris—that's being pulled toward the black hole but hasn't yet crossed the event horizon.
Step 2: Adding Depth with Shading Techniques
The key to making your black hole drawing look realistic is mastering shading techniques. Start by darkening the central singularity, but leave a very slight gradient rather than making it completely black. This creates the illusion of depth and prevents the center from looking flat.
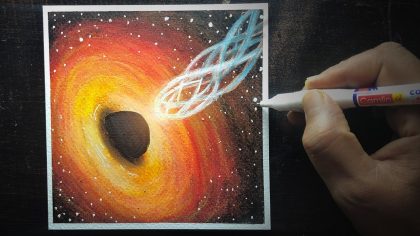
For the accretion disk, use a gradient approach. The inner edge should be darkest, gradually becoming brighter as you move outward. Use smooth transitions between light and dark areas to create the glowing effect characteristic of accretion disks. Pay special attention to creating radial gradients that radiate outward from the center.
The area around the event horizon should show the most dramatic contrast. Create a bright ring just outside the event horizon, representing the intense energy released as matter approaches the black hole. This area should be the brightest part of your drawing, with a sharp transition to the darker central region.
Step 3: Incorporating Gravitational Lensing Effects
One of the most fascinating aspects of black holes is how they warp light around them. This effect, known as gravitational lensing, creates the illusion that the accretion disk appears both in front of and behind the black hole simultaneously.
To achieve this effect, extend the upper portion of your accretion disk above the black hole, then curve it downward on both sides. The lower portion should appear to bend upward, creating an Einstein ring effect where the disk seems to wrap around the black hole. This creates the distinctive "slingshot" appearance that makes black hole illustrations so compelling.
The key is creating smooth, flowing curves that suggest the warping of space itself. Use reference images to understand how light bends around massive objects, and don't be afraid to exaggerate the effect for artistic impact.
Step 4: Adding Cosmic Background Elements
To make your black hole drawing truly stand out, consider adding cosmic background elements. These might include distant stars, nebulae, or other celestial bodies that provide context and scale to your composition.
Place stars and other objects around the black hole, paying attention to how they're affected by the gravitational lensing. Stars near the black hole should appear distorted, stretched, or multiplied due to the warping of light. This creates a more dynamic and scientifically accurate scene.
You can also add subtle color effects to enhance the cosmic feel. While black holes themselves are invisible, the surrounding matter often emits light across various wavelengths. Consider adding hints of blue, red, or purple to the accretion disk to suggest different temperatures and energies.
Step 5: Refining Details and Final Touches
The final stage of your black hole drawing involves refining details and adding finishing touches. Use your precision eraser to create bright highlights along the edges of the accretion disk, suggesting intense radiation and energy emission.
Add subtle texture to the accretion disk to suggest turbulent motion and varying densities of matter. This might include small swirls, eddies, or areas of concentrated brightness that imply dynamic processes at work.
Consider the overall composition of your drawing. The black hole should be the focal point, but the surrounding elements should guide the viewer's eye through the scene. Use contrast, color, and positioning to create a balanced and engaging composition.
Digital Techniques for Drawing Black Holes
If you're working digitally, you have access to additional tools that can enhance your black hole illustrations. Layer effects in programs like Photoshop allow you to create complex lighting and shading without affecting your base drawing.
Use gradient tools to create smooth transitions between light and dark areas. Digital brushes can simulate various textures and effects, from the smooth glow of hot gas to the sharp points of distant stars.
Filters and adjustments can help you achieve specific visual effects. For example, lens flare effects can enhance the bright areas around your black hole, while blur effects can suggest motion or depth.
Common Mistakes to Avoid
When learning how to draw a black hole, beginners often make several common mistakes. One of the most frequent errors is making the central singularity completely black, which removes depth and dimension from the drawing. Instead, use subtle gradients even in the darkest areas.
Another mistake is neglecting the perspective and curvature of the accretion disk. Remember that we're viewing this three-dimensional structure on a two-dimensional surface, so proper perspective is crucial for realism.
Many artists also forget to include the gravitational lensing effects that make black hole illustrations so distinctive. Without these warped light patterns, the drawing may look more like a simple spiral galaxy than a black hole.
Conclusion
Drawing a black hole is a fascinating artistic challenge that combines scientific understanding with creative expression. By following these steps and understanding the physics behind these cosmic phenomena, you can create stunning illustrations that capture both the beauty and mystery of black holes.
Remember that practice is essential when learning how to draw a black hole. Don't be discouraged if your first attempts don't match your vision—each drawing will help you understand the complex interplay of light, gravity, and matter that makes black holes so captivating.
Whether you're creating art for personal enjoyment, educational purposes, or professional projects, mastering the techniques of black hole illustration opens up a universe of creative possibilities. So grab your drawing materials, study those reference images, and start creating your own cosmic masterpieces today!