How To Draw Classic Sonic: A Complete Step-by-Step Guide For Beginners
Have you ever wanted to capture the lightning-fast energy of Classic Sonic on paper? Whether you're a nostalgic fan who grew up with the Sega Genesis or a new artist discovering this iconic character, learning how to draw Classic Sonic can be both fun and rewarding. This comprehensive guide will walk you through everything you need to know, from basic shapes to final details, helping you create your own version of this beloved blue hedgehog.
Understanding Classic Sonic's Design
Before diving into the drawing process, it's essential to understand what makes Classic Sonic distinct from his modern counterpart. Released in 1991 with Sonic the Hedgehog for the Sega Genesis, Classic Sonic features a simpler, more streamlined design that's perfect for beginners to master.
Classic Sonic's design emphasizes clean lines and basic shapes, making him more approachable for new artists. His proportions are more compact, with a slightly chubbier appearance compared to modern Sonic. The character's design was optimized for 16-bit graphics, resulting in bold, easily recognizable features that translate beautifully to hand-drawn art.
- Harry Potter Deaths Leaked This List Will Change How You See The Series Prepare To Cry
- Shocking Svu Cast Sex Scandal Leaked Videos Expose Dark Secrets
- Nude Photos From The Conjurings Real Investigation Leaked This Is 100 Real
Essential Tools and Materials
To begin your Classic Sonic drawing journey, you'll need the right tools. While professional artists might use specialized equipment, beginners can start with basic supplies:
- Drawing paper (preferably smooth surface)
- Pencils (HB for sketching, 2B for final lines)
- Eraser (kneaded erasers work best)
- Ruler (for straight lines)
- Fine-tip pens or markers (optional, for inking)
- Colored pencils or markers (for coloring)
Basic Shapes and Proportions
Every great drawing starts with basic shapes. Classic Sonic's body can be broken down into simple geometric forms that anyone can master:
The Head: Start with a circle for the main head shape. This will serve as your foundation.
- Porn Scandal Rocks Dancing With The Stars Wicked Nights Secret Footage Leaked
- Pam Bondis Nightmare What Trump Secretly Posted On Truth Social Has Everyone Talking
- Corey Feldmans Shocking Dwts Performance Leaked You Wont Believe What He Did
The Body: Draw an oval or slightly rounded rectangle beneath the head, connecting at the neck area.
The Arms and Legs: Use cylinders for the limbs, keeping them relatively short and stubby to match Classic Sonic's proportions.
The Hands and Feet: Draw ovals for the hands and larger, more exaggerated ovals for the feet, as Classic Sonic's feet are notably large and prominent.
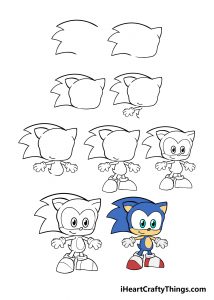
Step-by-Step Drawing Process
Step 1: Creating the Basic Framework
Begin by lightly sketching the basic shapes we discussed. Draw a circle for the head, positioning it slightly to the right if you want Sonic facing forward. Add the oval body directly beneath it, making sure the proportions feel balanced. Connect these shapes with gentle curves for the neck and torso.
Next, sketch light guidelines for the facial features. Draw a vertical line down the center of the face and a horizontal line across the middle. These will help you place the eyes and other features symmetrically.
Step 2: Adding the Facial Features
Classic Sonic's face is characterized by large, expressive eyes that take up much of his head. Using your guidelines, draw two almond-shaped eyes that are wide and slightly angled. The eyes should be large enough to show the black pupils with a small white highlight in each.
Add small, triangular ears on top of the head, pointing outward. Draw the snout as a small oval extending from the bottom of the face, and add a tiny triangular nose at the end.
Step 3: Drawing the Spikes
One of Classic Sonic's most iconic features is his spiky hair. Start with three large spikes on top of his head, each one curving slightly backward. These spikes should be tall and dramatic, extending well above the head circle you drew earlier.
Add two smaller spikes on each side of the head, making sure they flow naturally with the overall shape. The key is to make the spikes varied in size and angle while maintaining a cohesive look.
Step 4: Crafting the Body and Limbs
Now it's time to refine the body shape. Classic Sonic has a slightly rounded, athletic build. Connect the head to the body with smooth curves, creating the illusion of a neck without drawing it too prominently.
Draw the arms as simple curved lines extending from the shoulders. Classic Sonic's arms are usually bent at the elbows, ready for action. For the hands, draw simple glove shapes with the signature large, round cuffs.
The legs should be short and powerful-looking. Draw them extending from the bottom of the body, keeping the proportions consistent with the rest of the character. The feet are particularly important - make them large and rounded, with the distinctive curved shape that allows Sonic to run at high speeds.
Step 5: Adding Details and Accessories
Classic Sonic's gloves are one of his most recognizable features. Draw them as simple shapes covering the hands, with the characteristic large, round cuffs at the wrists. The gloves should look slightly oversized, adding to Sonic's playful appearance.
Add the shoes, which are arguably the most detailed part of the drawing. Classic Sonic wears red and white sneakers with a distinctive design. Draw the main shoe shape, then add the white stripe around the middle, the red patches on the sides, and the yellow buckles or straps.
Don't forget the tail - a small, curved shape extending from the back of the body. While subtle, it's an important detail that completes Sonic's silhouette.
Common Mistakes to Avoid
When learning how to draw Classic Sonic, beginners often make several common mistakes:
Incorrect Proportions: Making Sonic's head too small or his body too large can throw off the entire drawing. Remember, his head should be quite large relative to his body.
Spikes Too Small: Many artists make Sonic's spikes too short or too uniform. They should be tall, varied, and dynamic.
Overcomplicating Details: Classic Sonic's design is meant to be simple and bold. Avoid adding too many unnecessary details that clutter the drawing.
Poor Line Quality: Using sketchy, uncertain lines can make your drawing look messy. Practice creating smooth, confident lines.
Coloring Your Classic Sonic Drawing
Once you're satisfied with your pencil drawing, it's time to add color. Classic Sonic's color scheme is simple but iconic:
- Body: Bright blue (cobalt or royal blue works well)
- Eyes: Green (emerald green is most accurate)
- Belly and Arms: Tan or light peach
- Gloves: White
- Shoes: Red with white stripes and yellow buckles
When coloring, use smooth, even strokes and consider adding subtle shading to give your drawing depth. The belly patch should be a lighter color than the body, creating contrast.
Advanced Techniques and Tips
As you become more comfortable with the basic drawing, try these advanced techniques:
Dynamic Poses: Classic Sonic is all about speed and energy. Practice drawing him in running poses, jumping, or rolling into a ball.
Action Lines: Add motion lines behind Sonic to emphasize his speed and create a sense of movement.
Background Elements: Place Sonic in simple environments like Green Hill Zone with grass, flowers, and checkered patterns.
Expression Variations: Experiment with different facial expressions to capture Sonic's energetic personality.
Practice Exercises
To improve your Classic Sonic drawing skills, try these exercises:
Daily Sketches: Spend 10-15 minutes each day drawing Sonic from different angles.
Reference Study: Look at official artwork and screenshots to understand accurate proportions and details.
Speed Drawing: Time yourself drawing Sonic to improve your confidence and efficiency.
Variation Practice: Draw Sonic in different poses, expressions, and situations to expand your skills.
Digital Drawing Options
If you prefer digital art, many of the same principles apply. Use drawing software like Procreate, Photoshop, or free alternatives like Krita. Digital tools offer advantages like:
- Easy corrections with undo functions
- Layers for organizing different elements
- Custom brushes for various effects
- Color adjustment tools for perfect palettes
Conclusion
Learning how to draw Classic Sonic is a journey that combines understanding basic shapes, practicing fundamental techniques, and developing your artistic style. Remember that every artist starts somewhere, and even professional illustrators had to begin with simple sketches.
The key to success is consistent practice and patience. Don't be discouraged if your first attempts don't match your vision - each drawing is a step forward in your artistic development. Focus on the fundamentals we've covered: basic shapes, proper proportions, clean lines, and the iconic details that make Classic Sonic instantly recognizable.
As you continue practicing, you'll find your own style emerging, and soon you'll be able to draw Classic Sonic with confidence and creativity. Whether you're creating fan art, designing original characters, or just enjoying a fun hobby, the skills you develop will serve you well in all your artistic endeavors.
So grab your pencils, find a comfortable spot, and start bringing this blue blur to life on your paper. Happy drawing!