Understanding Your Car's AC System: A Complete Guide To Automobile AC Diagrams
Have you ever wondered how your car's air conditioning system actually works? When you press that AC button on a hot summer day, a complex system of components springs into action, working together to transform hot air into cool, refreshing comfort. Understanding your automobile AC diagram isn't just for mechanics—it can help you diagnose problems, communicate better with technicians, and even save money on repairs.
The automotive AC system is a marvel of engineering, using principles of thermodynamics to cool your vehicle's interior. But without a proper understanding of how these components connect and function, troubleshooting issues becomes nearly impossible. That's why having a clear automobile AC diagram is essential for every car owner who wants to understand their vehicle better.
How an Automotive AC System Works: The Basic Principles
Before diving into the specific components, it's important to understand the fundamental principles behind air conditioning. The AC system operates on the refrigeration cycle, which involves the continuous compression, condensation, expansion, and evaporation of refrigerant. This cycle allows the system to absorb heat from inside your vehicle and release it outside, creating that cool air you enjoy.
- Jared Fogles Secret Life Behind Bars Nude Photos And Porn Ring Leak Revealed
- Secret Affair Between Fresh Prince Cast Members Leaked Texts Reveal All
- You Wont Believe Whats Actually Open On Thanksgiving Number 3 Is A Game Changer
The entire process revolves around the refrigerant's ability to change states between liquid and gas at relatively low temperatures. As the refrigerant transitions between these states, it either absorbs or releases heat, which is the core mechanism that makes air conditioning possible. Understanding this basic concept will make reading an automobile AC diagram much more intuitive.
Main Components of an Automobile AC System
Let's explore the key components that make up your car's AC system, as typically shown in a comprehensive automobile AC diagram.
The Compressor: The Heart of the System
The compressor is often called the heart of the AC system because it pumps refrigerant throughout the entire circuit. Driven by a belt connected to the engine, the compressor takes low-pressure refrigerant gas and compresses it into a high-pressure, high-temperature gas. This process is crucial because it prepares the refrigerant for the next stage of the cycle.
- Explosive Viral Scandal How A Leak Destroyed Bella And Gigi Hadids Bond Forever
- You Wont Believe This Mary Kate And Ashley Olsens Hidden Sex Scandal Finally Revealed
- Pam Bondis Nightmare What Trump Secretly Posted On Truth Social Has Everyone Talking
In most automobile AC diagrams, the compressor is typically the first component you'll see, as it's usually located near the front of the engine and connected directly to the serpentine belt. Modern compressors often include a clutch that engages and disengages based on cooling demand, helping to improve fuel efficiency.
The Condenser: Releasing Heat to the Atmosphere
After leaving the compressor, the hot, high-pressure refrigerant flows to the condenser. Located at the front of the vehicle, typically in front of the radiator, the condenser acts like a small radiator. As outside air passes through the condenser's fins (either through natural airflow or with the help of the radiator fan), the refrigerant releases its heat and condenses from a gas into a liquid state.
This heat exchange process is vital for the AC system's efficiency. If your condenser is damaged or blocked by debris, your AC won't cool effectively, as shown in many automobile AC diagrams where the condenser is positioned for optimal airflow.
The Expansion Valve or Orifice Tube: Controlling Flow
The expansion valve or orifice tube is a critical component that controls the flow of refrigerant into the evaporator. This component creates a pressure drop that allows the refrigerant to expand and cool rapidly. In automobile AC diagrams, you'll often see this component located between the condenser and evaporator.
The expansion valve is a more sophisticated option that can adjust flow based on cooling demand, while the orifice tube is a simpler, fixed-aperture device. Most modern vehicles use expansion valves for better efficiency and temperature control.
The Evaporator: Creating Cold Air
The evaporator is where the magic happens—it's where cold air is actually created. Located inside the dashboard, typically in the HVAC (Heating, Ventilation, and Air Conditioning) housing, the evaporator receives the cold, low-pressure refrigerant from the expansion valve. As warm air from the cabin passes over the evaporator coils, the refrigerant inside absorbs the heat, cooling the air that's then blown into your vehicle.
In a typical automobile AC diagram, the evaporator is shown as the final major component before the refrigerant returns to the compressor, completing the cycle. A properly functioning evaporator is essential for effective cooling, and problems here often manifest as reduced cooling capacity or unusual odors.
Understanding the Refrigerant Flow Path
When looking at an automobile AC diagram, you'll notice that the refrigerant follows a specific path through the system. This closed-loop circuit ensures that the refrigerant continuously cycles through its various states, providing consistent cooling.
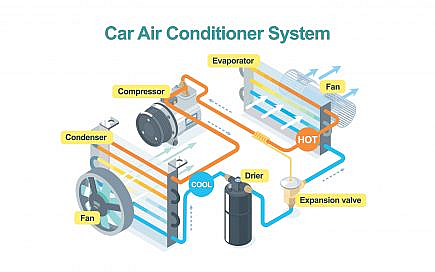
The flow typically moves from the compressor to the condenser, then through the expansion device, into the evaporator, and back to the compressor. Along this path, various sensors and switches monitor pressure and temperature to ensure safe and efficient operation. Understanding this flow path is crucial for diagnosing problems and understanding how modifications to one part of the system can affect the entire circuit.
Common AC System Configurations
Not all automotive AC systems are created equal. Different vehicle manufacturers and models may use slightly different configurations, which are clearly illustrated in various automobile AC diagrams.
Some vehicles use a thermal expansion valve (TXV) system, while others use an orifice tube system. The main difference lies in how refrigerant flow is controlled. TXV systems are generally more efficient and provide better temperature control, while orifice tube systems are simpler and more cost-effective. Your vehicle's specific configuration will be evident in its automobile AC diagram, helping you understand the exact layout of your system.
Reading and Interpreting AC Diagrams
Being able to read and interpret an automobile AC diagram is a valuable skill for any car owner or DIY mechanic. These diagrams use standardized symbols to represent different components and show how they're connected through refrigerant lines and electrical circuits.
When examining an AC diagram, look for symbols representing the compressor, condenser, expansion device, and evaporator. You'll also see lines representing refrigerant flow, with arrows indicating direction. Electrical connections are typically shown with different line styles, and pressure/temperature sensors are marked with specific symbols. Understanding these conventions will help you navigate even complex automobile AC diagrams with confidence.
Troubleshooting Using AC Diagrams
One of the most practical applications of understanding your automobile AC diagram is troubleshooting problems. When your AC isn't working correctly, the diagram can help you identify potential causes and locate components that need inspection.
For example, if your AC is blowing warm air, you can trace the refrigerant path to identify where the cooling process might be breaking down. Is the compressor engaging? Is the condenser fan running? Are there any visible leaks in the refrigerant lines? Your automobile AC diagram serves as a roadmap for systematic diagnosis, saving you time and potentially expensive diagnostic fees.
Maintenance Tips for Your AC System
Regular maintenance of your AC system can prevent many common problems and extend the life of your components. When performing maintenance, always refer to your vehicle's specific automobile AC diagram to understand the exact layout and configuration of your system.
Key maintenance tasks include checking refrigerant levels, inspecting for leaks, cleaning the condenser, and replacing the cabin air filter. Some maintenance tasks, like checking refrigerant pressure, require specialized tools and knowledge, so it's often best to have these performed by a professional. However, visual inspections and basic cleaning can be done by most car owners with the help of a good automobile AC diagram.
When to Seek Professional Help
While understanding your automobile AC diagram can help you with basic troubleshooting and maintenance, some AC problems require professional expertise. If you're dealing with refrigerant leaks, electrical issues, or complex component failures, it's best to consult a qualified technician.
Professional mechanics have specialized tools for diagnosing AC problems, including refrigerant recovery machines, leak detectors, and manifold gauge sets. They can also safely handle refrigerants, which require proper certification due to environmental regulations. When in doubt, especially with complex issues, trust the experts to ensure your AC system is repaired correctly and safely.
Conclusion
Understanding your car's AC system through a comprehensive automobile AC diagram is an invaluable skill that can save you time, money, and frustration. From the compressor that pumps refrigerant to the evaporator that creates cold air, each component plays a crucial role in keeping you comfortable on the road.
By familiarizing yourself with how these components work together and learning to read AC diagrams, you'll be better equipped to maintain your system, troubleshoot problems, and communicate effectively with mechanics. Whether you're a DIY enthusiast or simply want to be more informed about your vehicle, knowledge of your automobile AC diagram is a powerful tool in your automotive care arsenal.